How to take a bitcoin-backed loan on BTCBacked, step by step
Your first loan on the BTCBacked phone app, from creating an account to getting your bitcoin back, with a screenshot for each step.
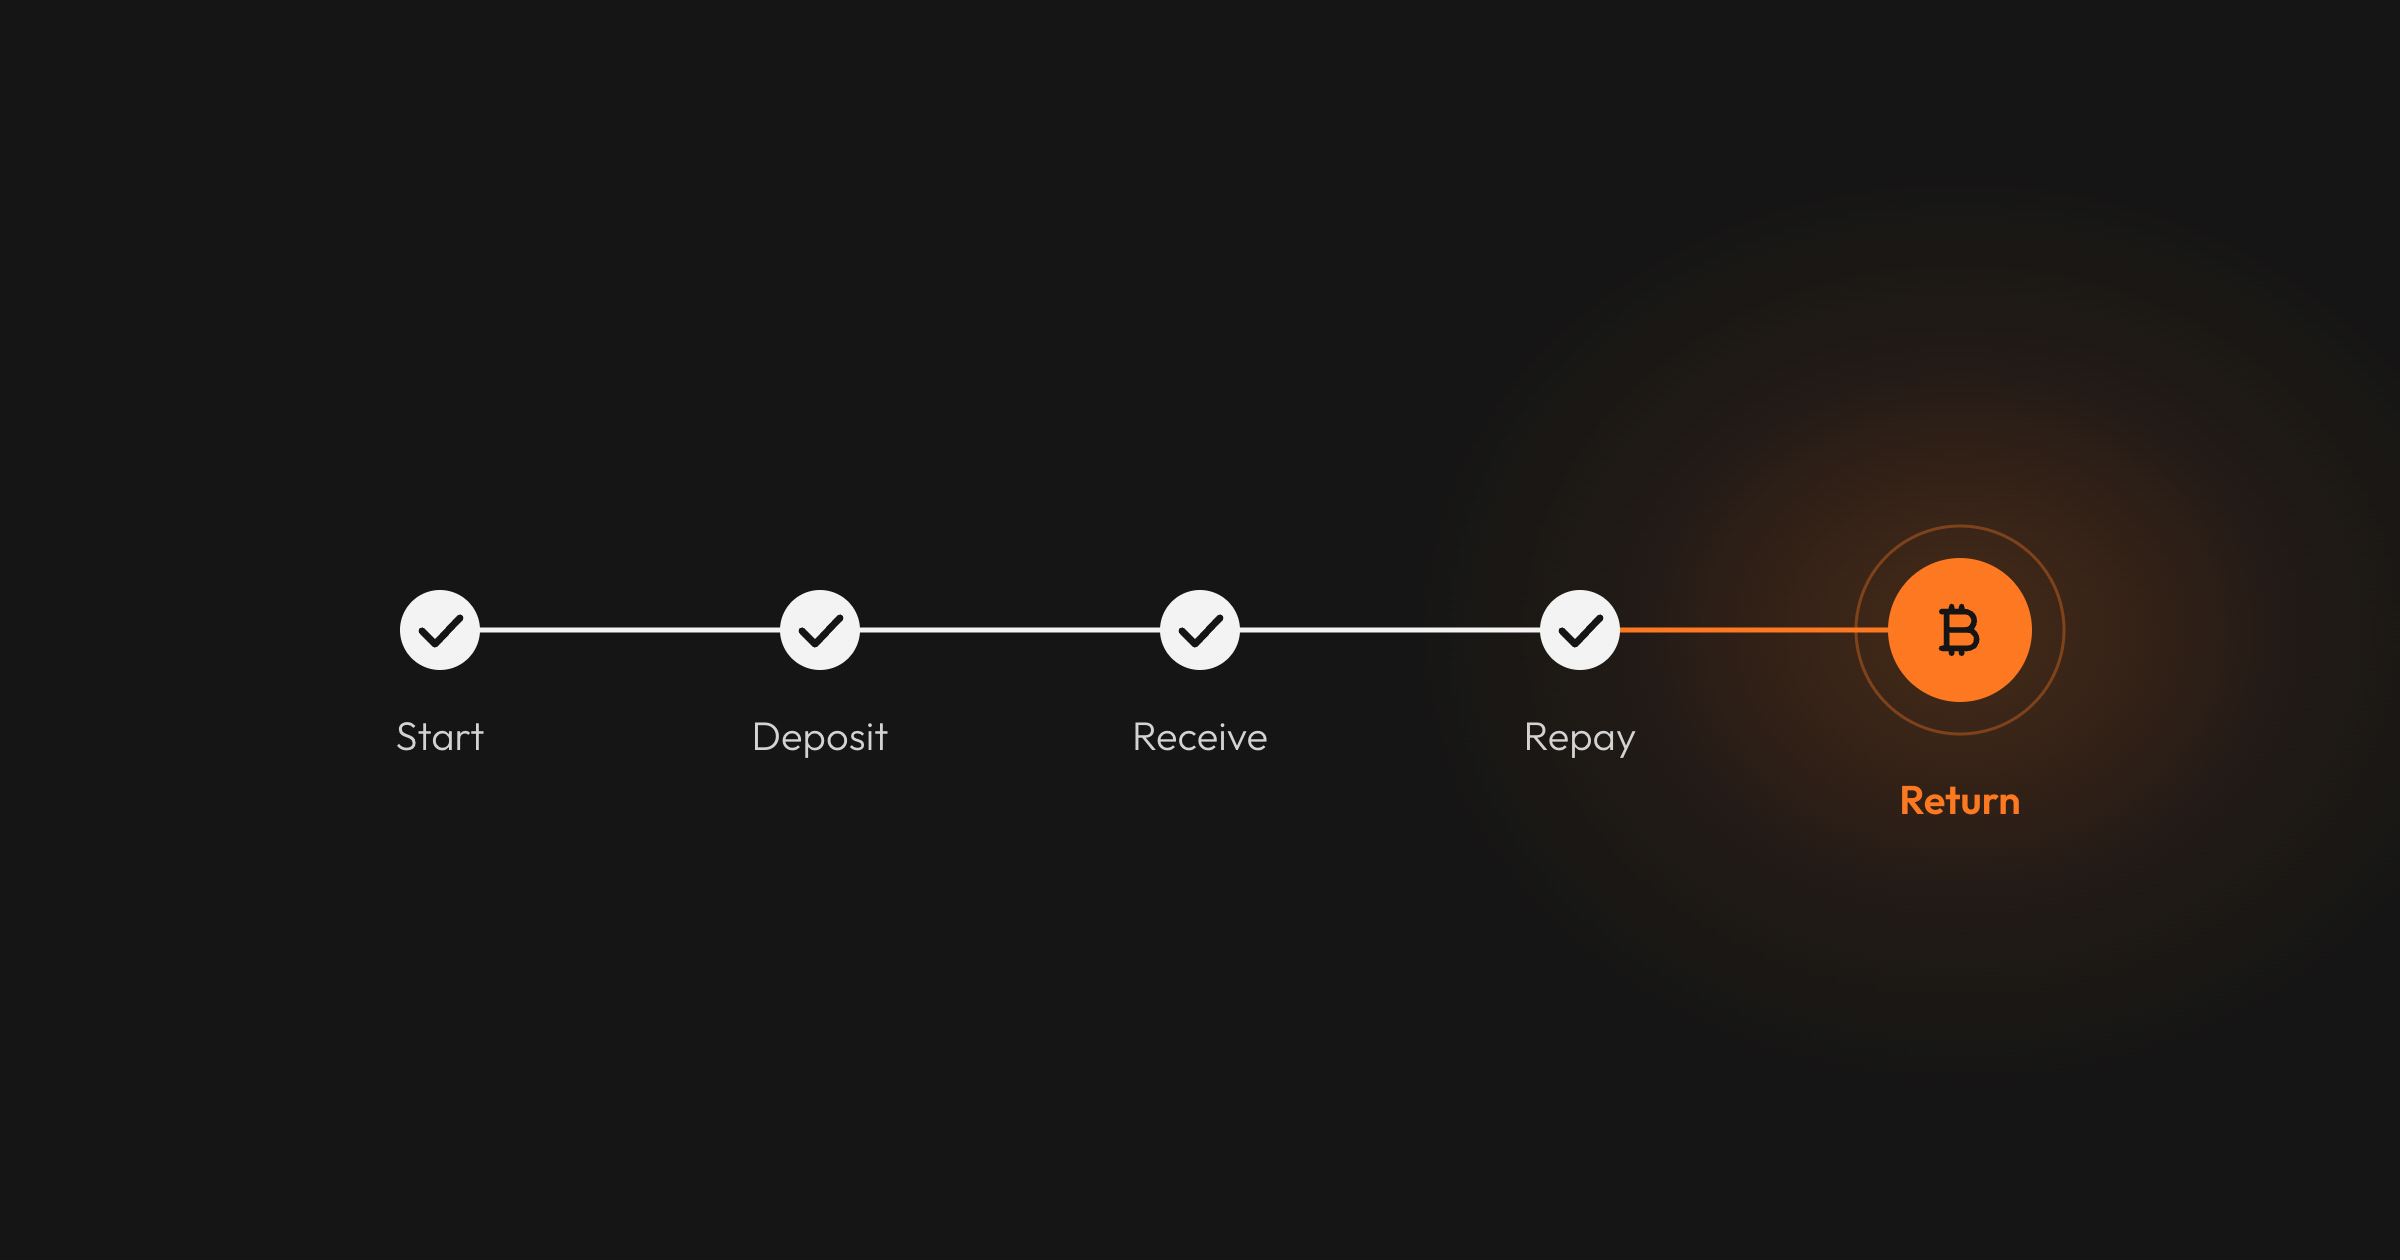
This guide takes you through your first loan on the BTCBacked phone app, from creating an account to getting your bitcoin back. You borrow stablecoins from a lender and lock bitcoin in an escrow as collateral until you repay. Loan-to-value compares what you still owe with the value of the bitcoin in the escrow. Read the last section, on liquidation, before you borrow.
The example loan
The example used throughout is illustrative, and so is its interest rate. Bitcoin is at 100,000 USD when the loan is agreed (1 USDT counted as 1 USD). Steps 13 and 14 show the loan after the price has fallen to 66,000 USD.
| Item | Illustrative example |
|---|---|
| Marketplace operator | BTCBACKED AG, Zug |
| Loan amount | 10,000 USDT on Ethereum |
| Term | 12 months |
| Interest rate | 8% a year, set in each offer by the borrower or lender who posts it, not by BTCBacked |
| Starting loan-to-value | 50% |
| You repay to the lender | 10,800 USDT (the loan plus 800 USDT interest) |
| Collateral | 0.216 BTC (21,600 USD), twice what you repay, for a 50% loan-to-value |
| Platform fee | 1.5% per year of the loan term, charged once: 0.0015 BTC (150 USD) |
| You deposit | 0.2175 BTC (the collateral and the platform fee), plus a small reserve for the network fee |
| Total cost (interest and platform fee) | 950 USD |
| Total amount payable | 10,950 USD |
| Annual percentage rate (APR), including the platform fee | 9.50% |
| Not included | Bitcoin network fees, which vary. The liquidation fee of 5% of the loan amount, paid in bitcoin from the collateral, due only if the loan is liquidated. |
Before the loan
1. Get the app
Download the BTCBacked app from the App Store or Google Play and open it. The app opens on "Log in". If you are new, tap "Create an account".
If you prefer a computer, use the web app at app.btcbacked.com/sign-up. It follows the same order, with a few extra screens and some different wording.
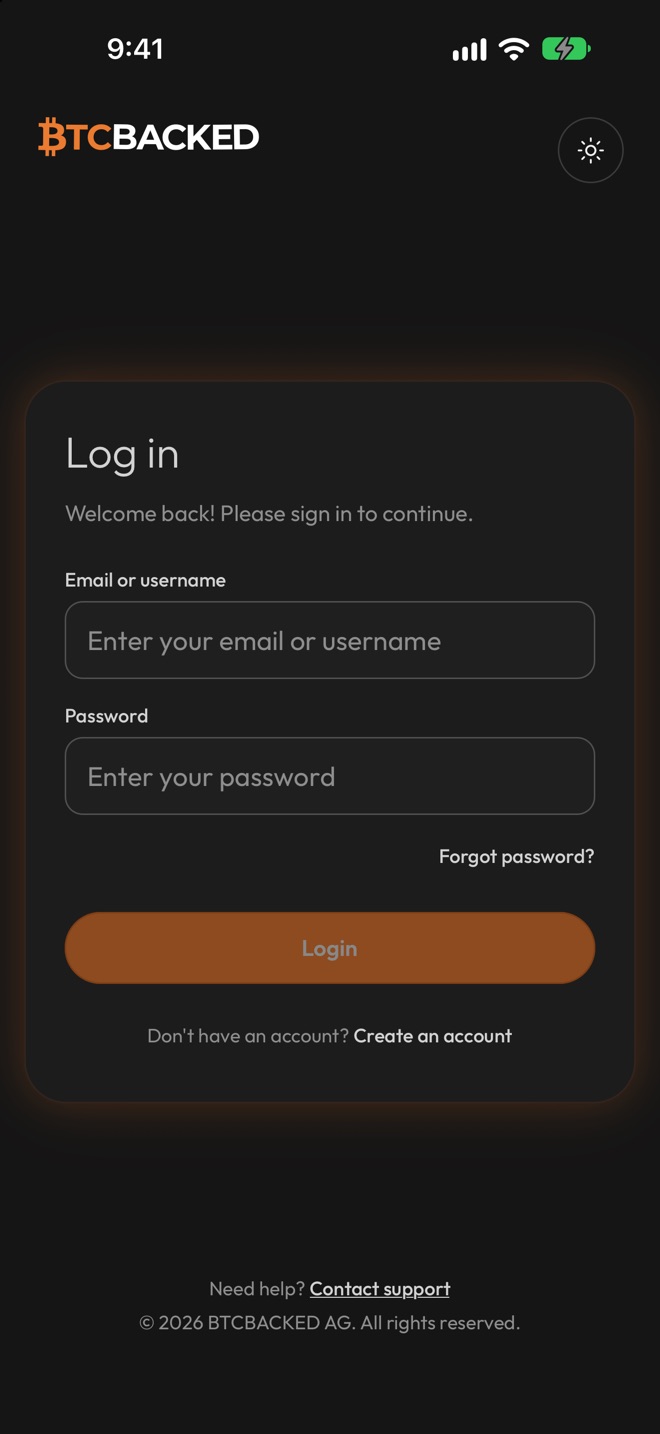 New to BTCBacked? Tap Create an account.
2. Create your account
Enter your email, a username and a login password that meets the rules shown under the field, then confirm the password. Tick the box to agree to the Terms of Service and Privacy Policy, and tap "Create account".
The app then shows "Verify your email". Open the link in the email you receive, then tap "Login".
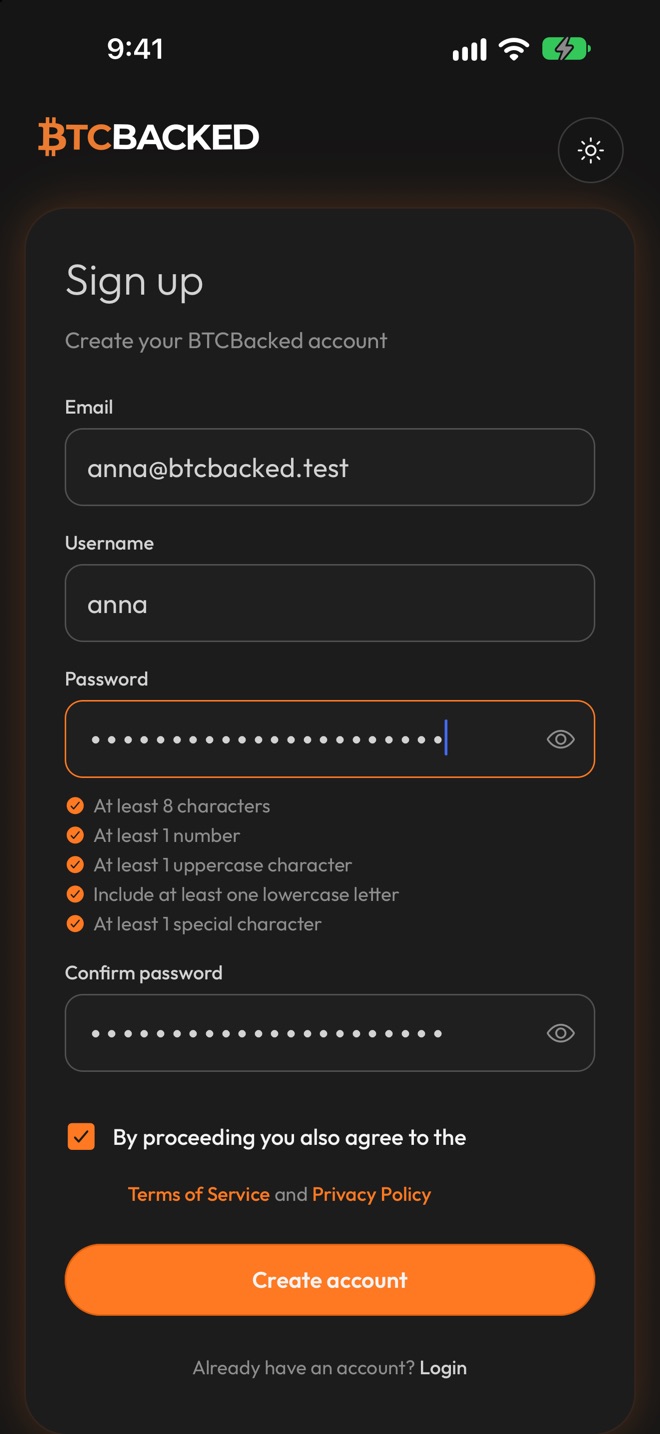 Choose your login details and accept the terms.
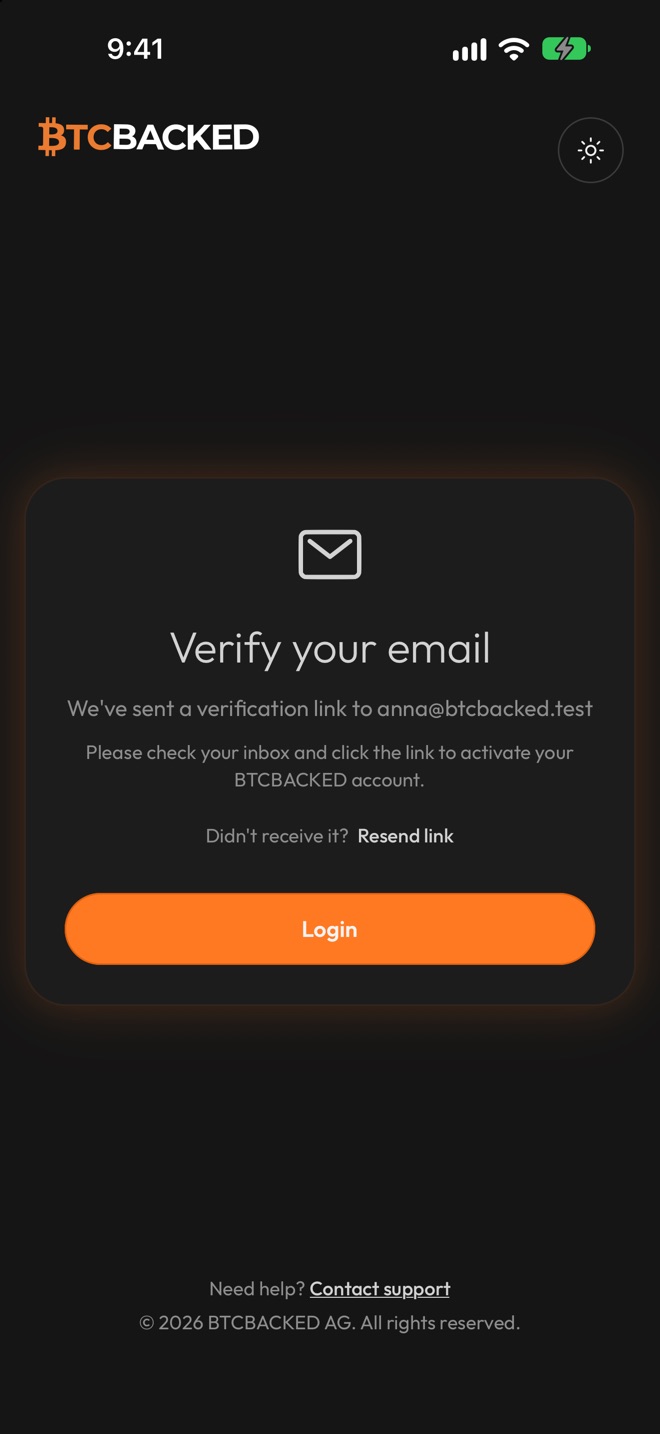 Confirm your email, then log in.
3. Verify your identity
A new account starts with "View-only access". You can browse offers, and borrowing unlocks once you complete basic verification. If you try to accept an offer before that, the app shows "Verification required. Tap to verify."
To verify:
- Open "Account verification". You can reach it from "Manage verification" in Settings, or from "Upgrade" on the "Borrow & lend limit" card on Home.
- Tap "Upgrade" under "Basic access".
- When the app asks you to "Have your passport or ID card ready", take a photo of it. If it has a chip, hold it to your phone to scan the chip.
"Two-factor authentication" in Settings is optional. If you turn it on, the app asks for a 6-digit code when you log in. It also asks for one before you confirm you received the loan, open a dispute, record a repayment or link your refund address, and before you sign the release of your bitcoin or a refund.
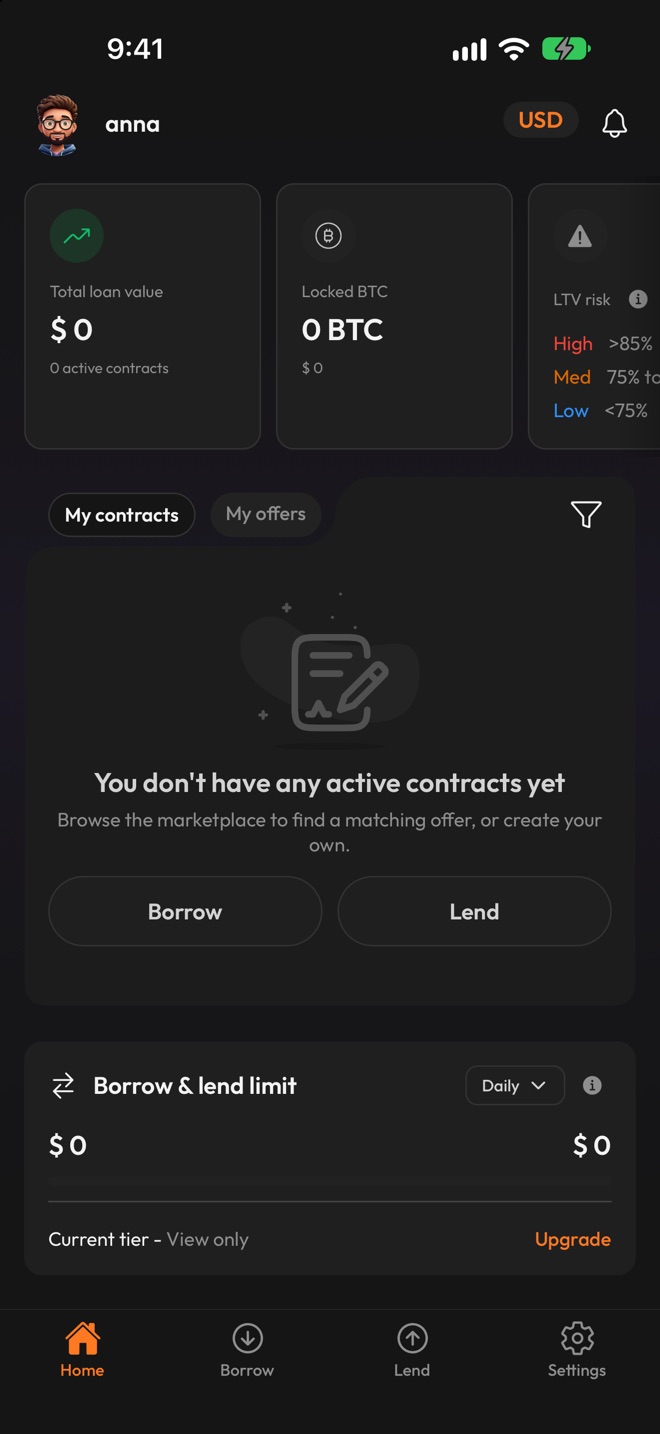 New accounts start at View only: tap Upgrade.
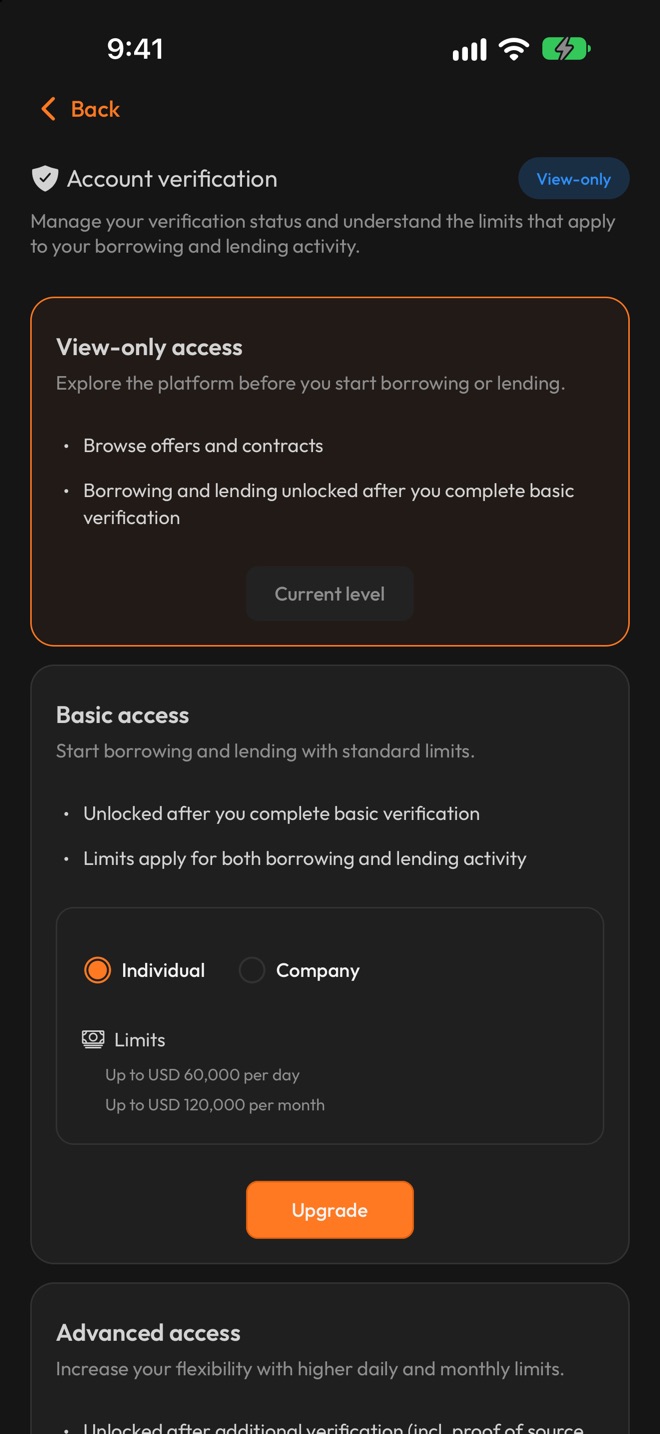 Under Basic access, tap Upgrade to verify your identity.
Find and accept a loan offer
4. Browse loan offers
Tap "Borrow" to see the "Available loan offers", and use the sort and filter buttons to narrow the list. Each offer shows what the lender "Wants to lend" (an amount range, the coin and its network) and the "Period". It also shows the yearly "Interest rate" and the starting loan-to-value as a badge, for example "60% LTV".
You can also post your own borrowing request with "Create offer", then "I want to borrow": you choose the coin and network, the amount and the loan period (each fixed or a range), the interest rate and the loan-to-value.
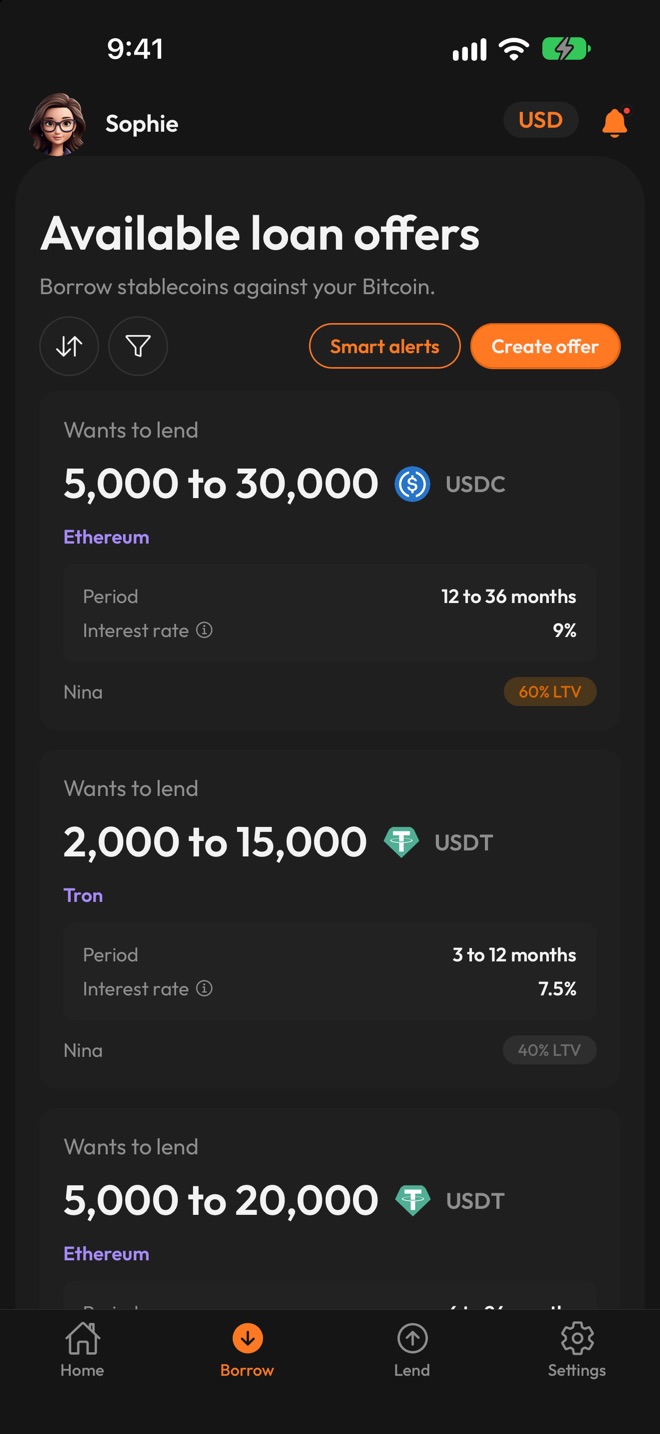 Compare offers by amount, period, rate and loan-to-value.
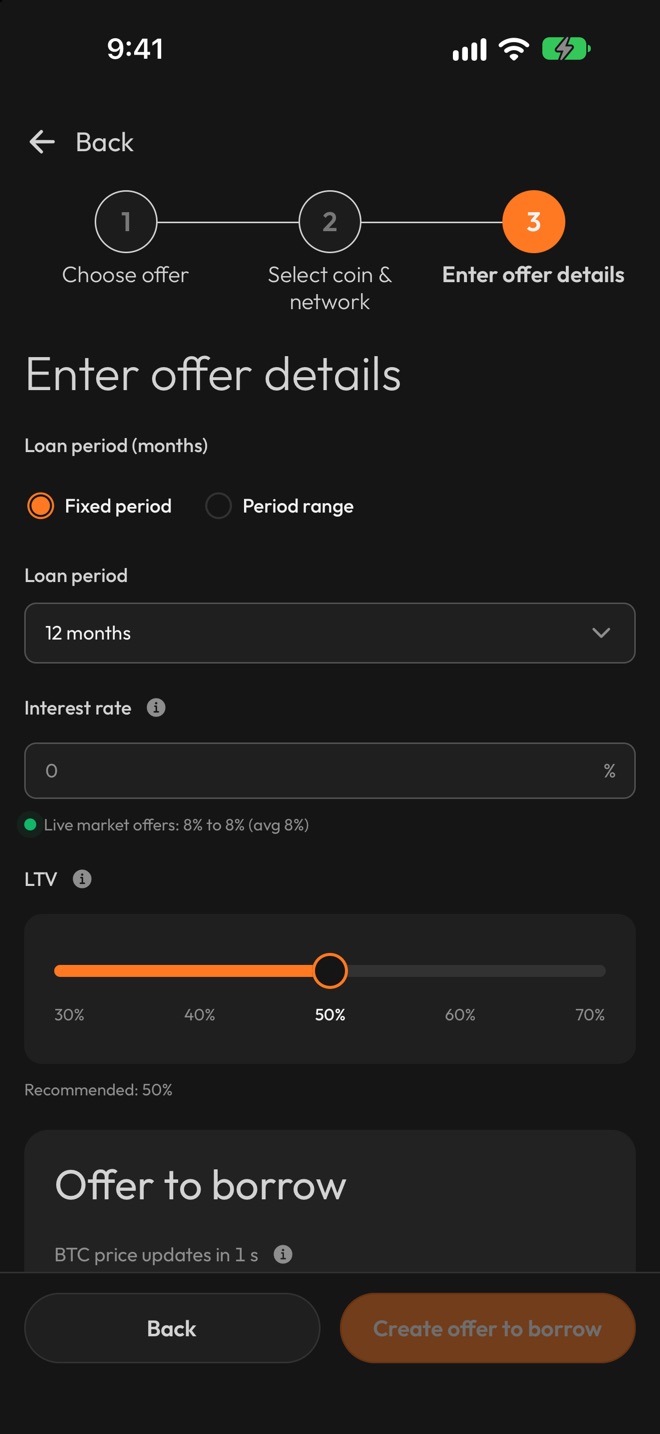 Or set your own terms with Create offer.
5. Accept an offer
Open an offer to see its terms, all set by the lender, with the lender's name and ratings. Under "I want to borrow", enter an "Amount" and choose a "Loan period" in whole months, within the offer's ranges. The summary below shows the "Total to repay" (the loan plus the interest). It also shows what you deposit: the "Collateral" plus the "Platform fee", which together make the "Escrow deposit", 0.2175 BTC in the example. The "All-in APR" is the interest rate plus the platform fee: 8% + 1.5% = 9.50% in the example.
Your collateral covers the loan plus the full interest, at the offer's starting loan-to-value. The interest is fixed when you accept, and you owe all of it even if you repay early. The information next to "Platform fee" on the offer page adds: "It is not refunded if the loan is repaid early."
Check the summary, then tap "Accept contract to borrow".
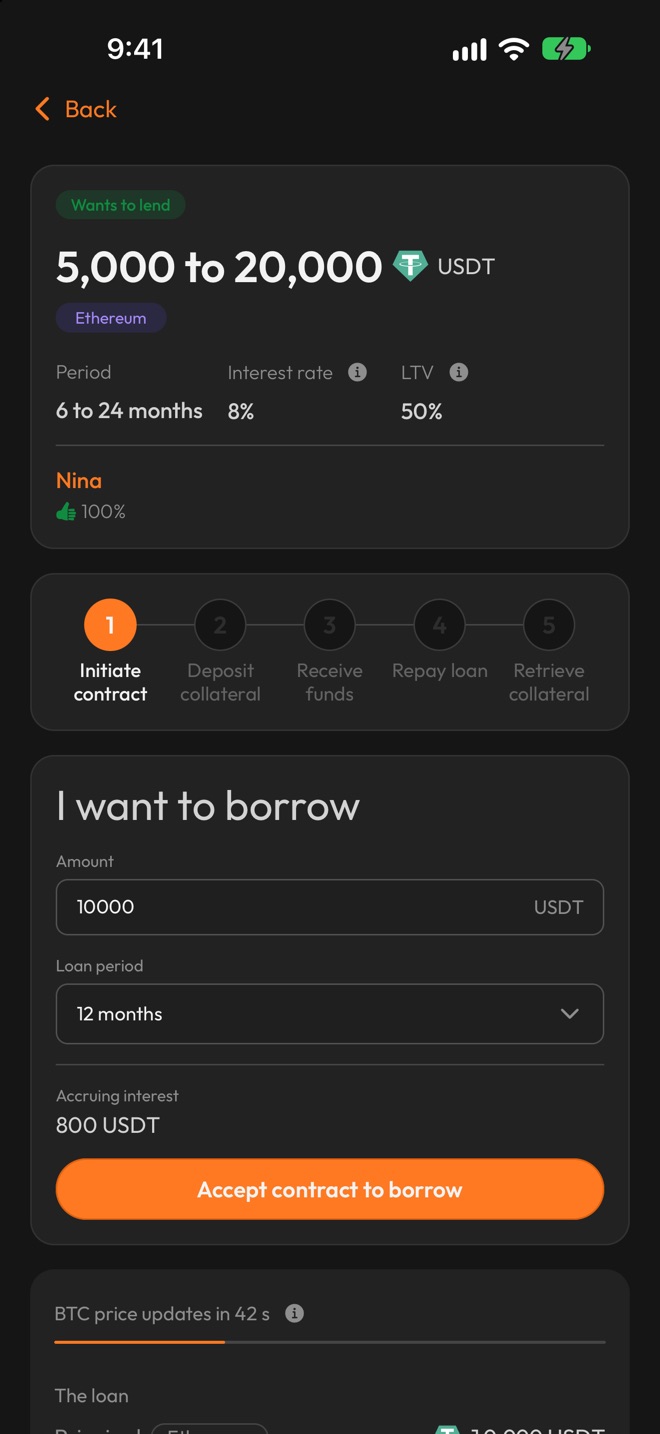 Enter how much you want to borrow, and for how long.
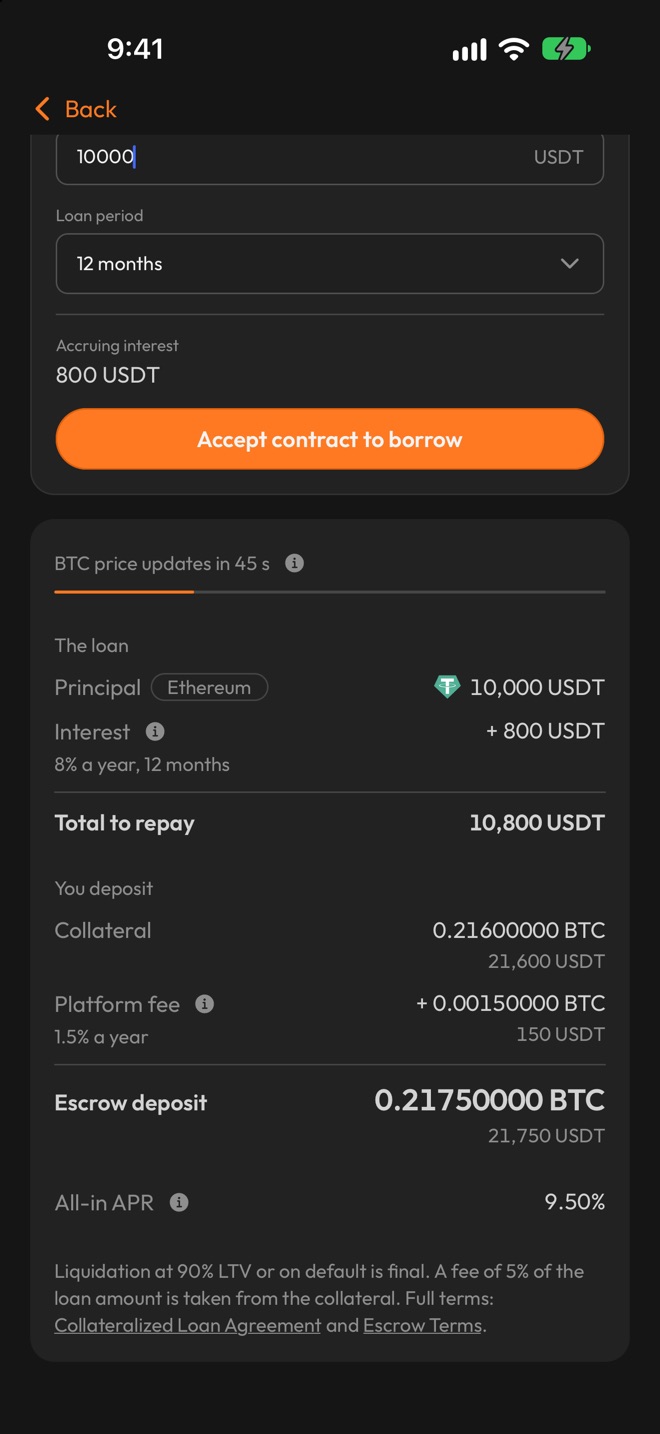 Check what you repay and what you deposit, then accept.
6. Add your stablecoin address
Right after you accept, the loan page opens. It tracks your loan in five stages: "Initiate contract", "Deposit collateral", "Receive funds", "Repay loan" and "Retrieve collateral". You have 12 hours from when you accept to complete this step and step 7, and the lender must finish their part in the same time. The "Remaining time" shows what is left. If it runs out, the loan is cancelled.
The page first asks: "Please provide your loan deposit address." This is your stablecoin address, where the lender will pay the loan. It must be for the coin and network of the offer: USDT on Ethereum or Tron, or USDC on Ethereum. You cannot change this address later, so check it carefully, then tap "Continue".
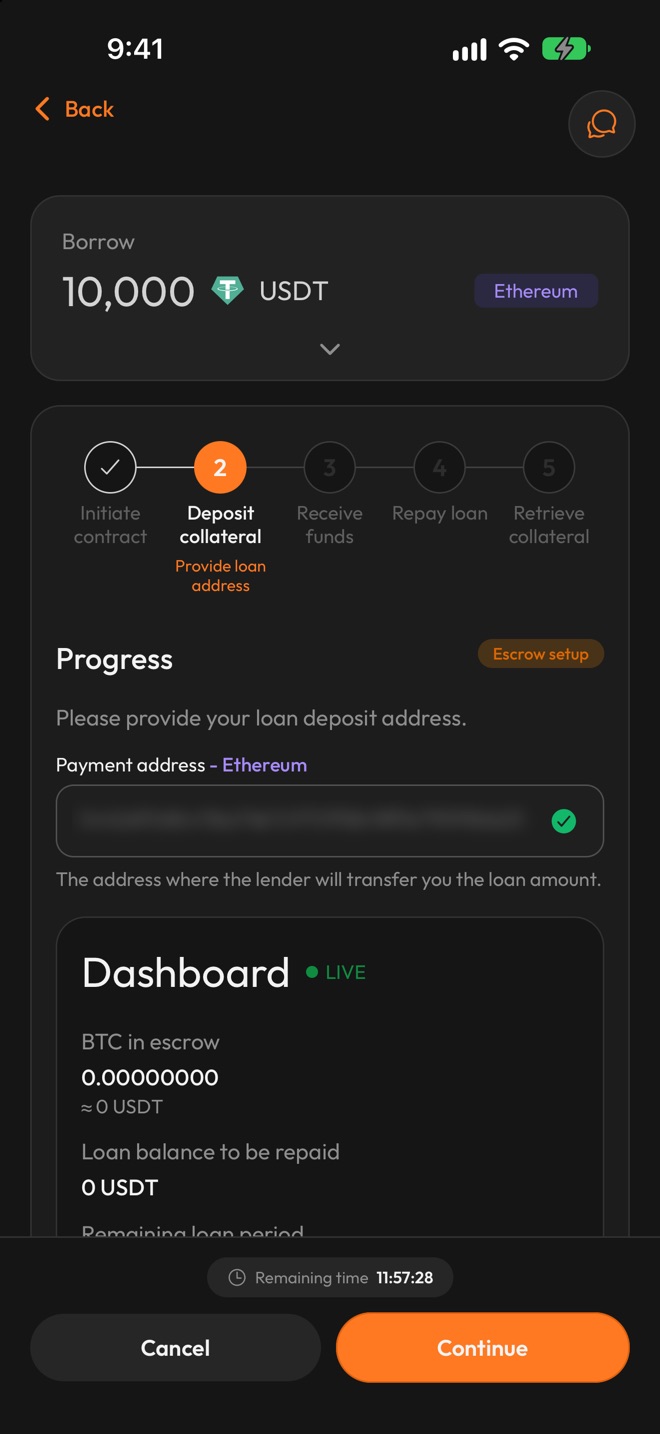 Add your stablecoin address. It cannot be changed later.
Set up the escrow and deposit
7. Set up your escrow key
The app asks "How do you want to hold your key to this escrow?" and offers "With a password" or "With my own wallet". To compare the two, see your escrow key: password or own hardware wallet.
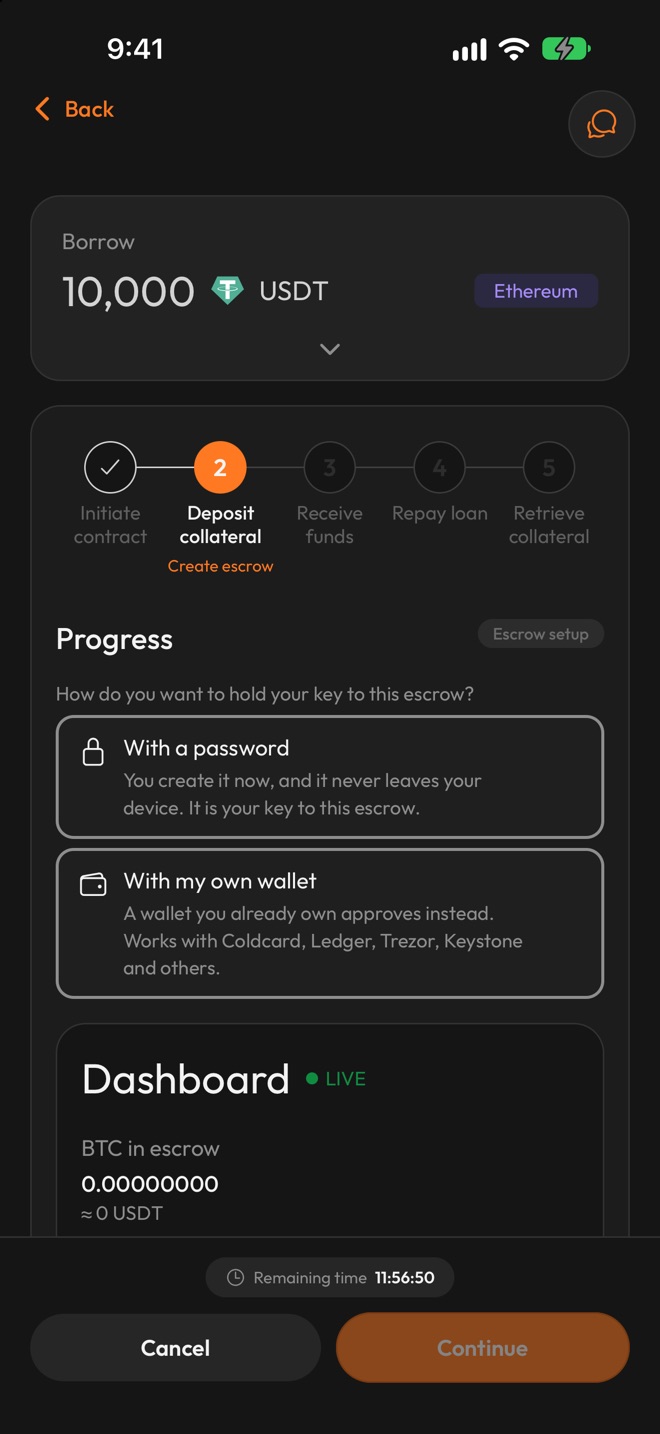 Choose: a password, or your own wallet.
If you choose "With a password", the app says: "You create it now, and it never leaves your device." This is your escrow password. It needs at least 15 characters, and it is not your login password. Before you continue, an "Important Reminder" warns that you need this password to release your bitcoin, that BTCBacked cannot recover it, and that each loan has its own. Write it down, keep it somewhere safe, then tap "Confirm". BTCBacked will never ask for your password.
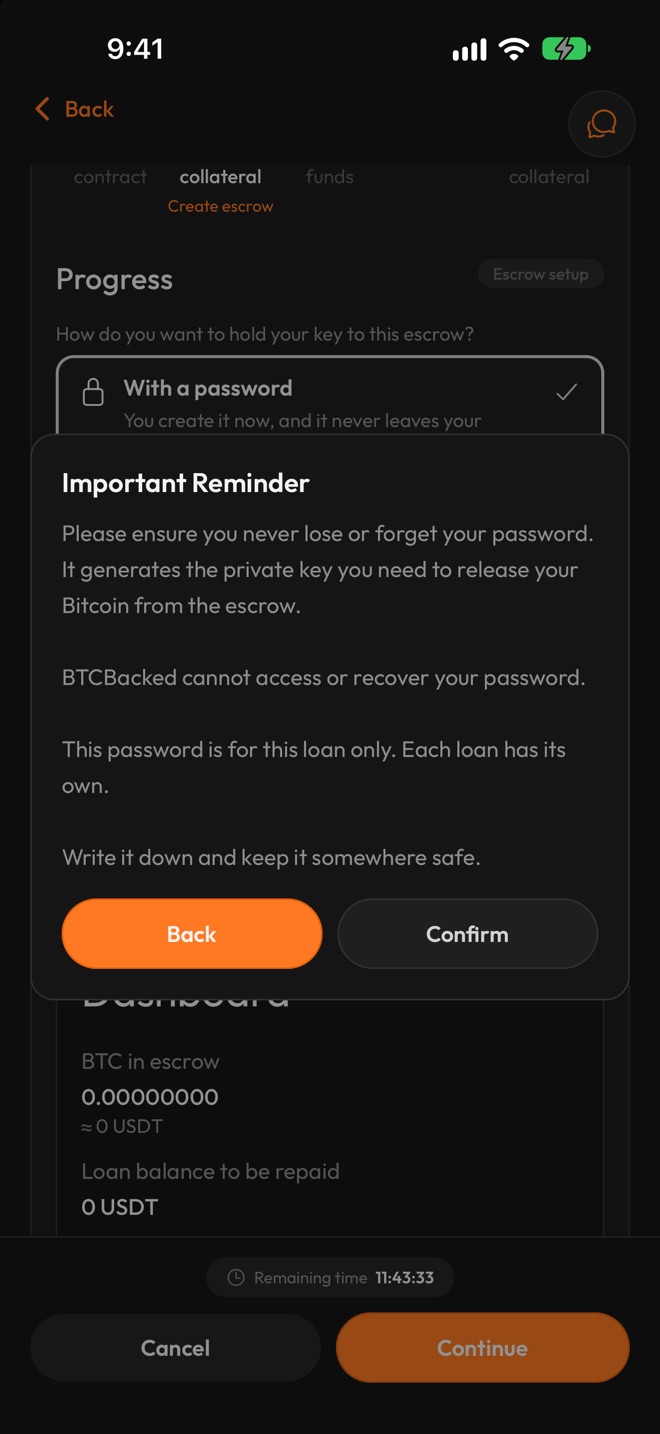 Write the password down: BTCBacked cannot recover it.
If you use your own hardware wallet, choose "With my own wallet". The same option also works with a software wallet, such as Sparrow on a computer. The app asks "Which are you using?" and lists the wallets it supports. Some, such as Ledger and Trezor, are tagged "Needs a computer".
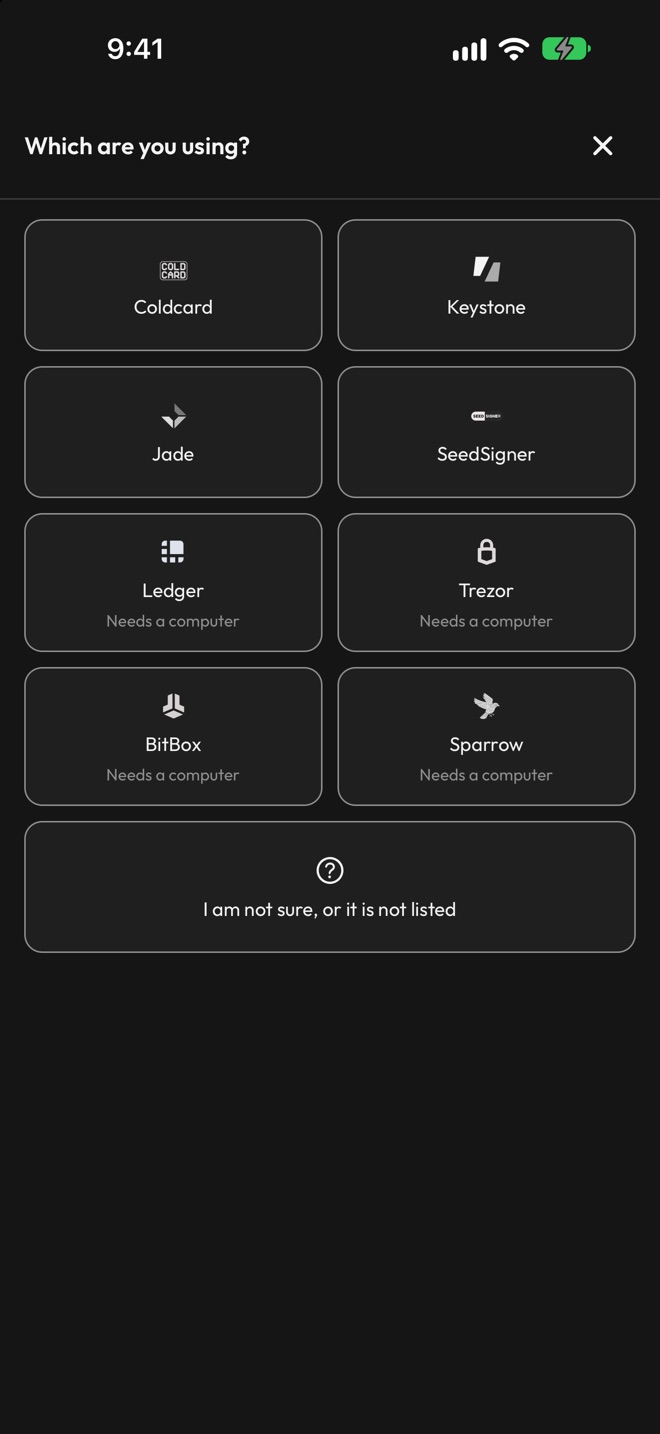 Pick your wallet from the list.
Once you pick your wallet, the app shows, step by step, how to export the key from it. It explains: "We only read a public key, and we use it to build your escrow address. It cannot move your Bitcoin." You then give the app the key with "Scan a QR code" or "Upload file", or by pasting it, depending on your wallet.
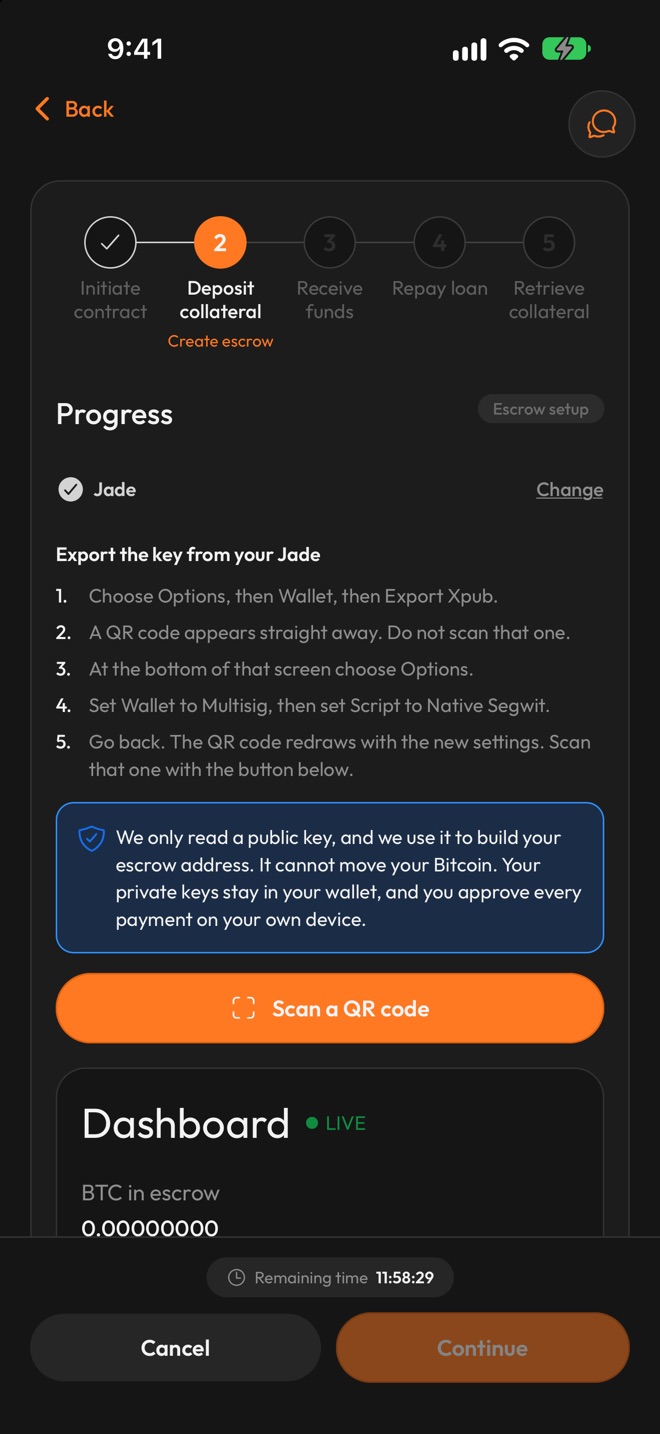 Follow the app's steps for your wallet (shown: Jade).
8. Deposit the collateral
If the lender has not finished their part yet, the app first says "Please wait while the lender completes the required steps to generate the escrow address."
The deposit screen then shows the "Collateral", the "Platform fee" and the "Total to deposit" (0.21750356 BTC on our test setup). It also shows a QR code and the "BTC escrow address", with "Copy address and amount". The "Collateral" line "Includes a small reserve for the network fee when the platform fee is paid from escrow." That is why the total is slightly above the 0.2175 BTC in step 5. The reserve depends on Bitcoin network fees when you accept, so your figure will differ slightly.
Send the total, in one transfer or several, so that the full amount arrives after your own network fee is paid.
The collateral then sits at an address that needs two of the three keys to move it: yours, the lender's and BTCBacked's. BTCBacked holds one of the three keys and cannot move the collateral alone (how 2-of-3 multisig works).
A new 12-hour limit starts when the escrow address appears, shown again under "Remaining time". Within it, your deposit must be confirmed on the Bitcoin network, and you must answer the source question in step 9. If the time runs out, the loan is cancelled, and you claim back in the app any bitcoin you sent.
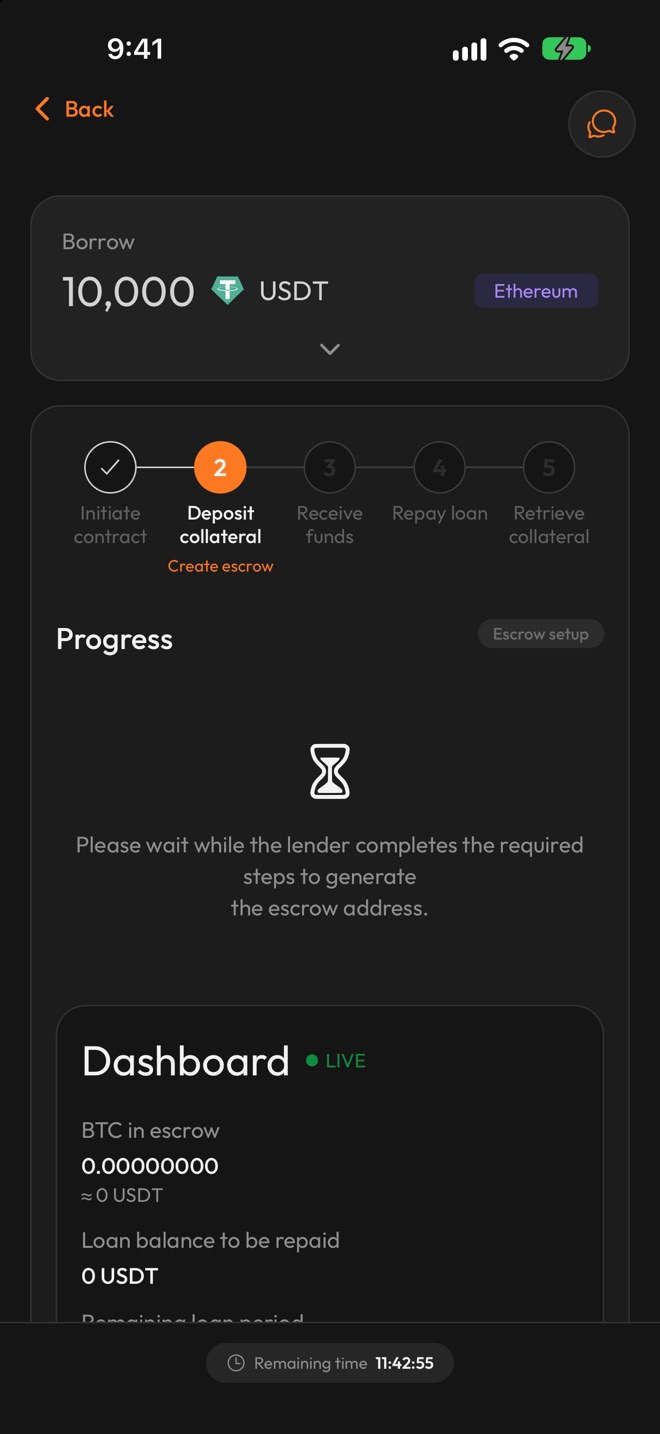 The lender finishes their part first.
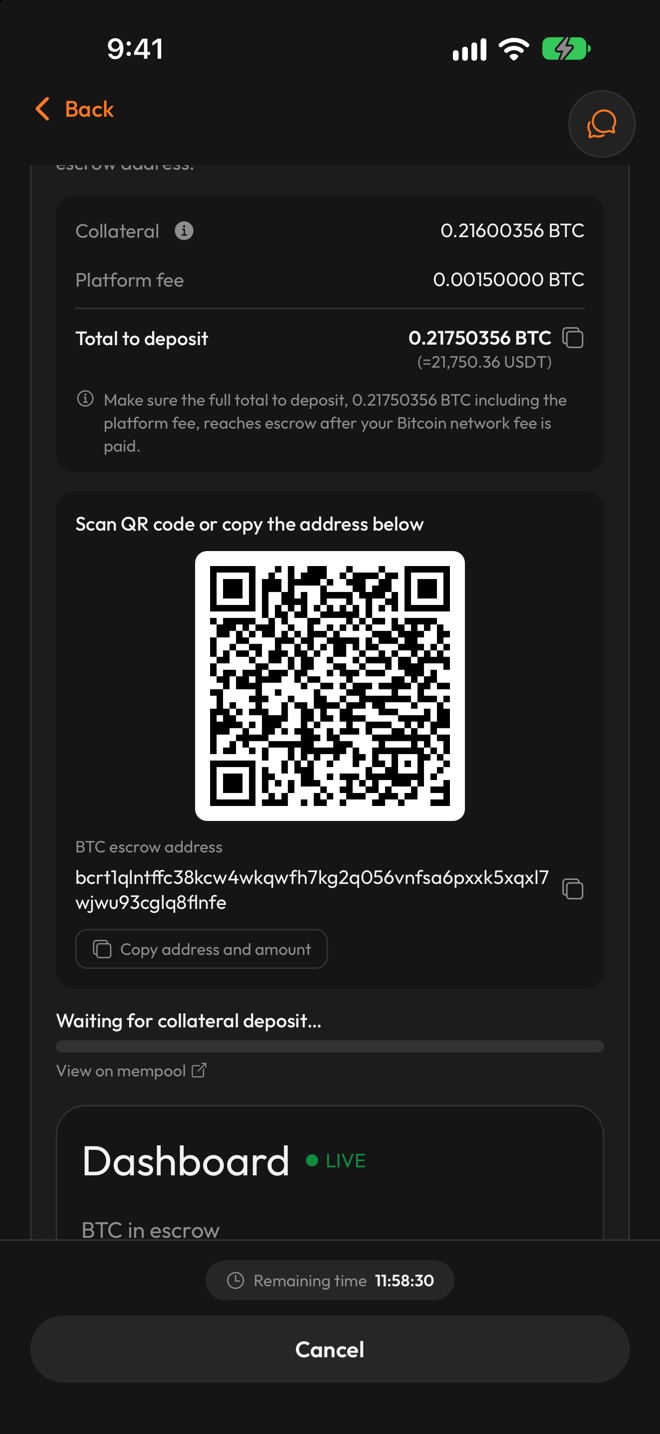 Send the total shown to this escrow address.
9. Say where the deposit came from
Once your deposit is confirmed, it is screened automatically. You may see "Almost there!" while the check runs. The app then explains: "To comply with anti-money-laundering rules, we need to verify the source of every incoming BTC deposit."
For each deposit, including later top-ups (step 14), it asks "Where did you send this BTC from?". Choose "Self-hosted wallet", or choose "Exchange / custodial wallet" and select the exchange, then tap "Submit".
You then see "Transaction details submitted!", and the lender can send the loan.
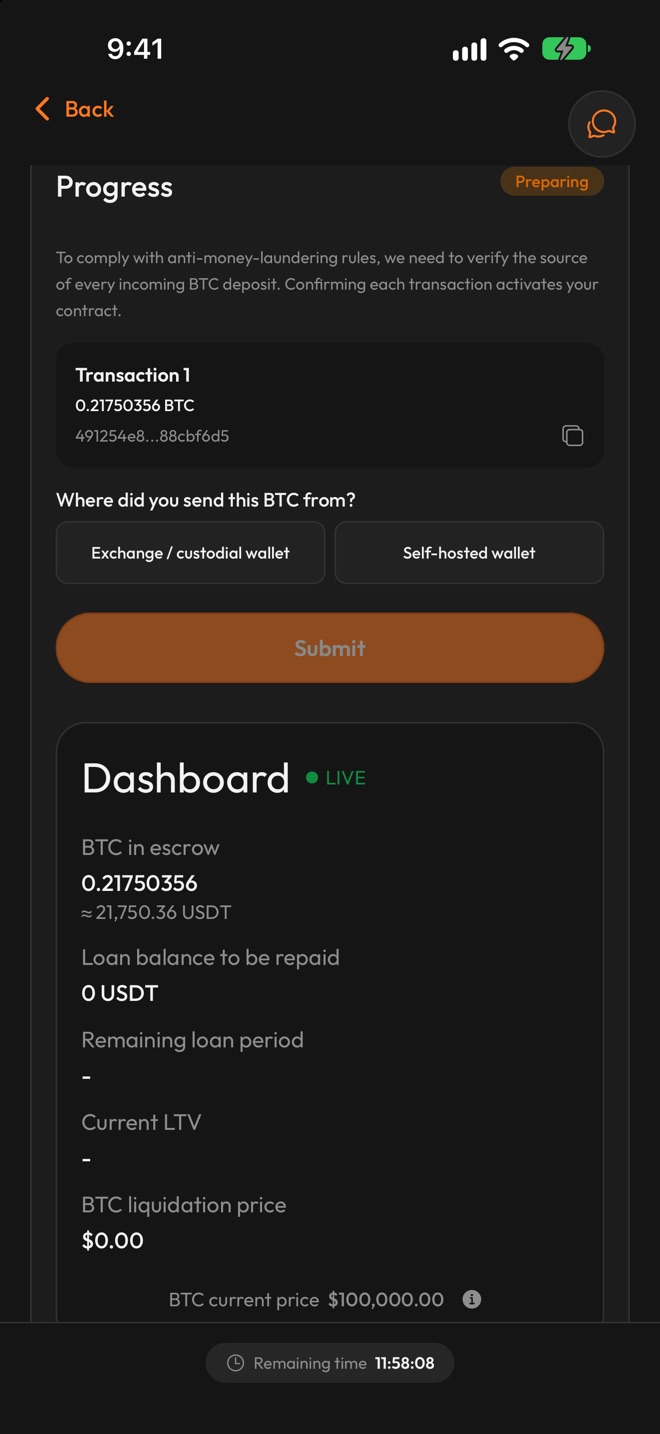 Say where the bitcoin came from, for every deposit.
Receive the loan
10. Receive the stablecoins and confirm
The lender sends the loan straight to your stablecoin address, the one you added in step 6. BTCBacked never holds the stablecoins. While you wait, the app says: "The lender has up to 12 hours to transfer the loan. You will be notified once the transfer is made."
When the lender has paid, the app shows the "USDT transaction hash" and the "USDT amount transferred". It says: "Please check your wallet and confirm that the funds have arrived at your address. The on-chain confirmations below do not replace this check."
Tap "Confirm" once the full amount is in your wallet, or "Dispute" if it is not. Your loan term starts when you confirm. If you do not confirm before the "Remaining time" runs out, a dispute opens automatically.
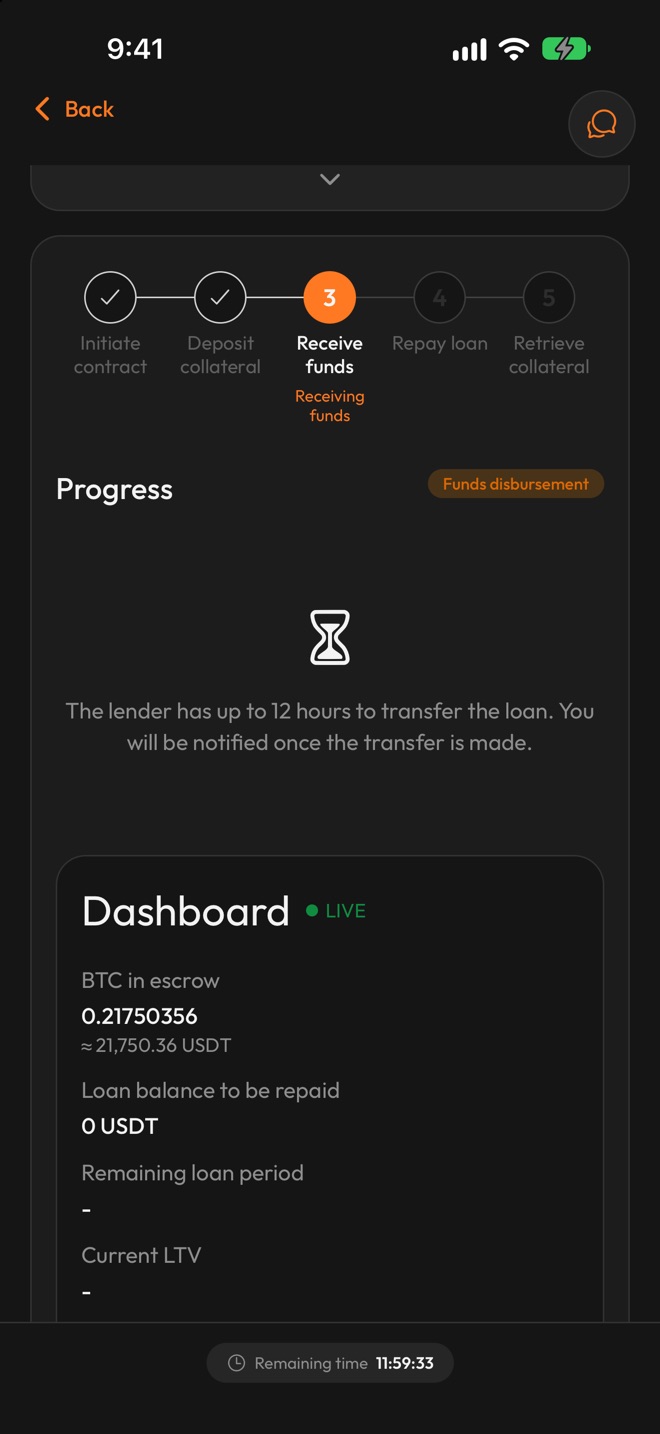 The lender has up to 12 hours to send the loan.
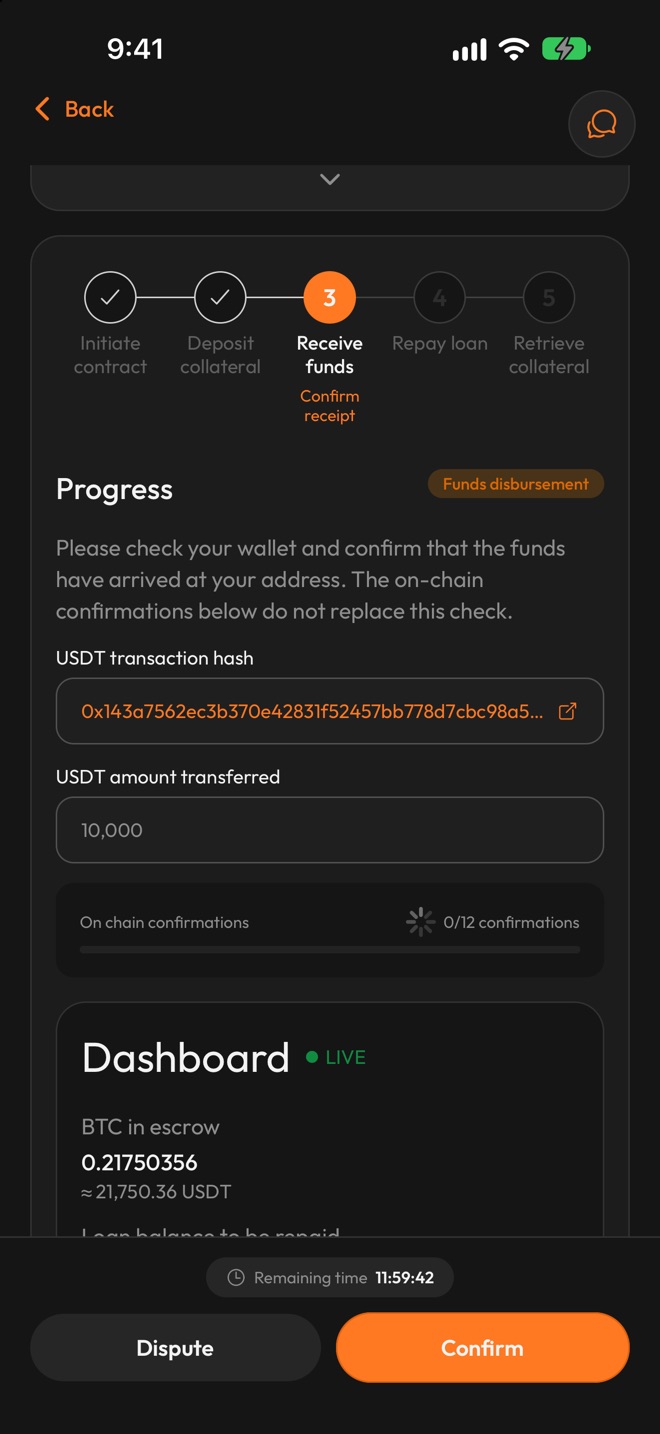 Confirm only once the stablecoins are in your wallet.
11. Pay the platform fee
After you confirm, the app says: "Sign to pay the platform fee. You already deposited it in escrow on top of your collateral, so nothing extra is needed. It covers your whole loan term and is paid once."
The screen shows "Fee 1.5% p.a." and "Over the full 12 month term that is 1.5% of your loan amount." In the example, that is 0.0015 BTC. The "Escrow breakdown" shows what stays in the escrow as "Remaining collateral".
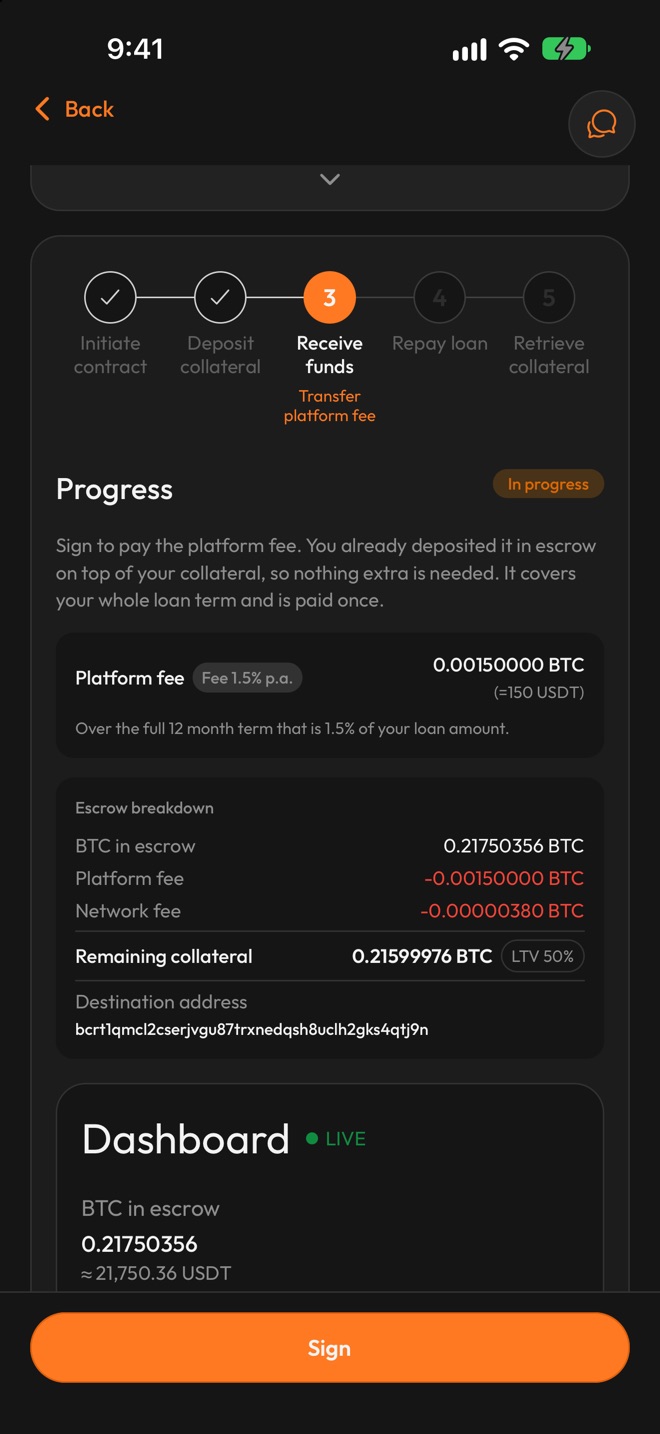 The fee is paid from the escrow: nothing extra to send.
How you sign depends on how you set up your escrow key in step 7.
With a password: tap "Sign", enter your escrow password and tap "Sign" again.
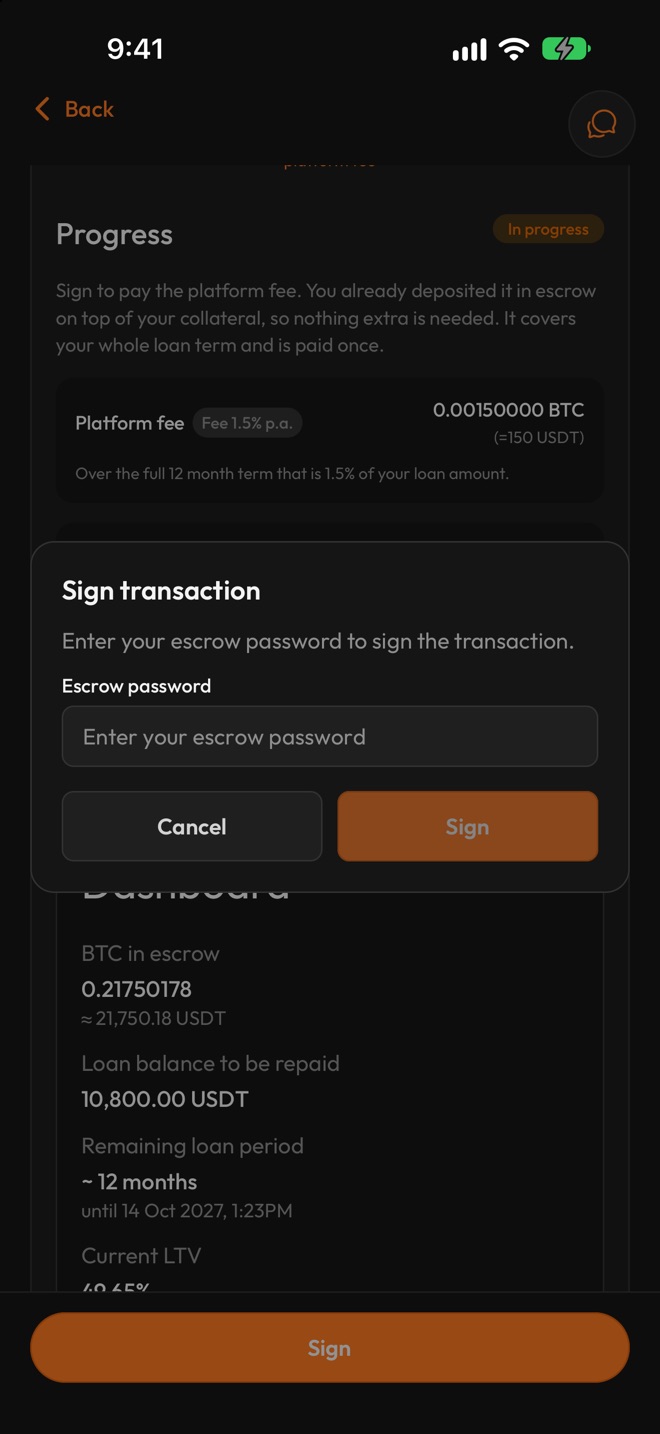 With a password: enter it and tap Sign.
With your own wallet: tap "Sign", then choose your wallet and the transfer method, QR code or file (a Jade uses QR code). Then add the escrow to your wallet, approve the payment there, and bring the approved payment back to the app. Tap "Submit approved payment".
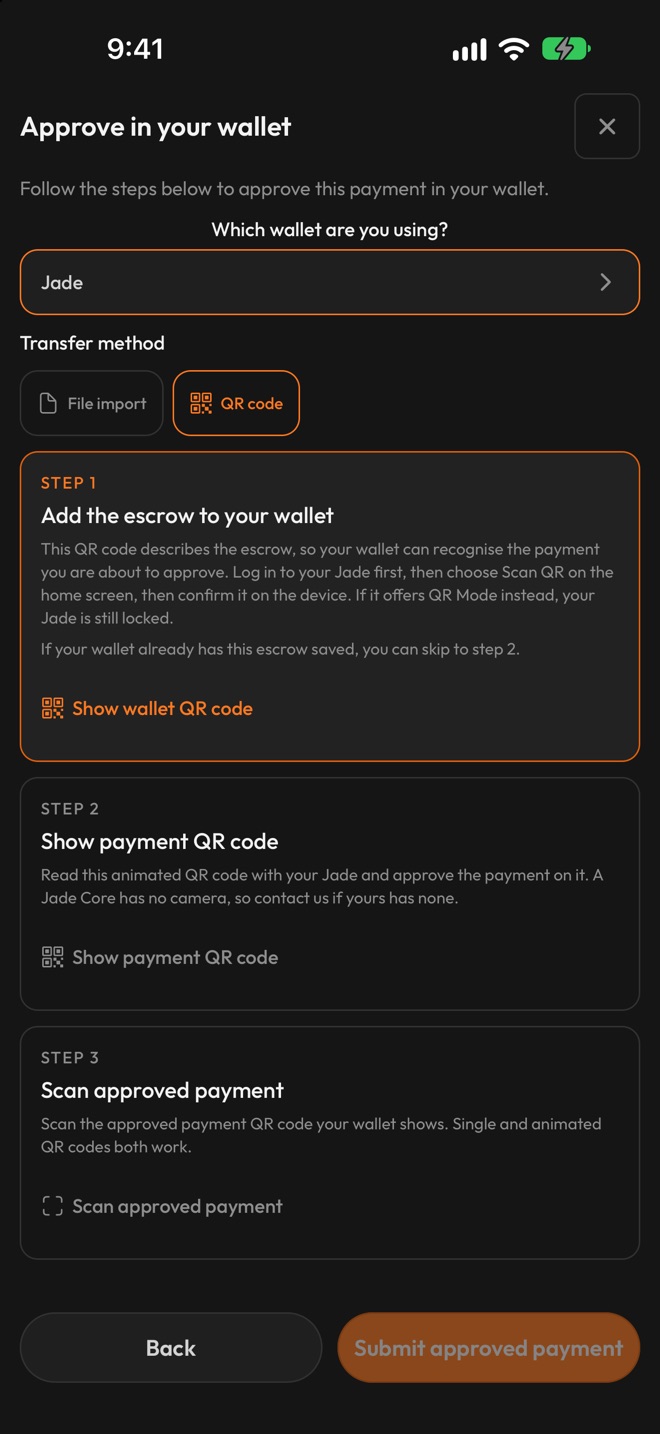 With your own wallet: approve in three steps (shown: Jade).
During the loan
12. Add your refund address
After the fee, the loan moves to "Repay loan" and asks: "Please provide the BTC address where your collateral should be returned once the loan is fully repaid." This is your refund address. Until it is linked and the fee payment is confirmed on the Bitcoin network, there is no repayment form and no "Add collateral". Your loan term is already running, so do this early.
- Tap "Add address" on the "BTC address required" card.
- Enter the bitcoin address where you want your collateral back. The address is screened.
- Tap "Verify ownership" and tick "This is a wallet I hold myself". The app notes: "Exchange and broker accounts cannot be used."
- Prove the wallet is yours. Choose your wallet, sign the "Message to sign" with it within 15 minutes, paste the signature and tap "Verify signature". If your wallet cannot sign, tap "Use the Satoshi test" instead. You send a small payment from the wallet you want to be paid to. That payment is not refunded.
- After a signature, the app links the address by itself and shows "Address linked to contract". After a Satoshi test, tap "Link address".
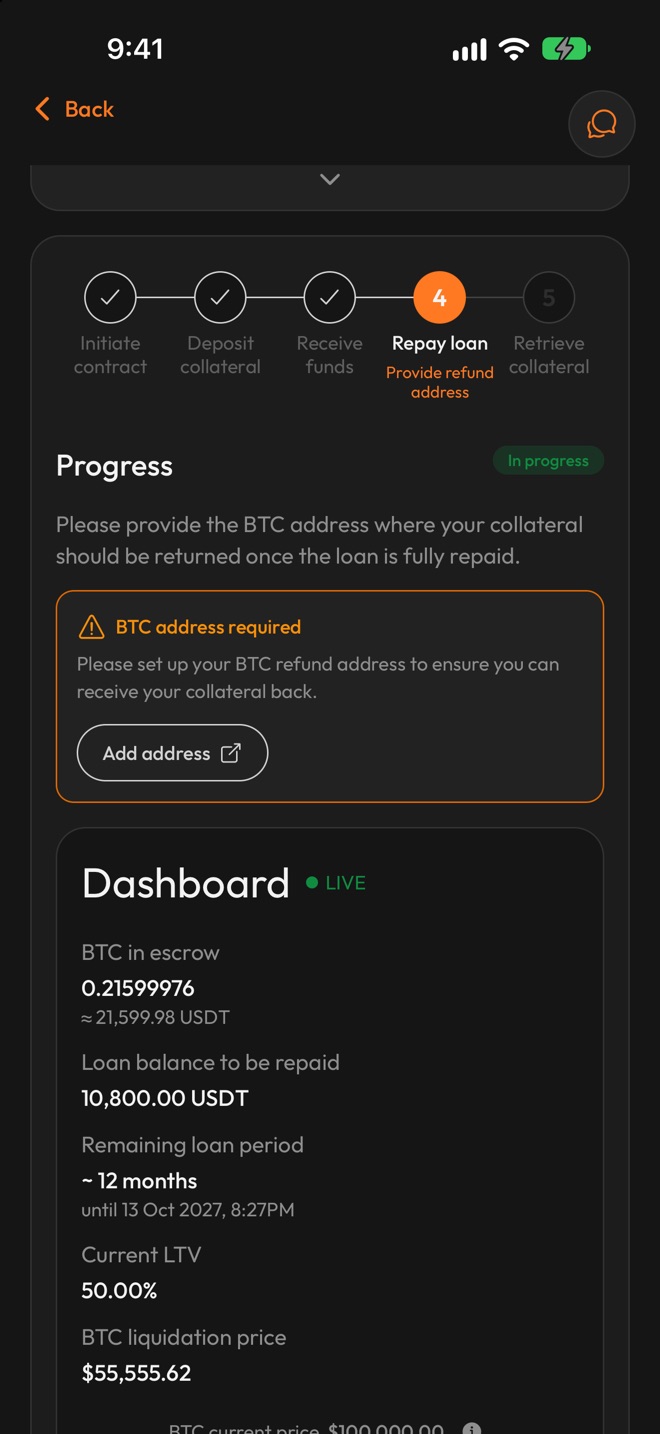 Add the address your bitcoin returns to.
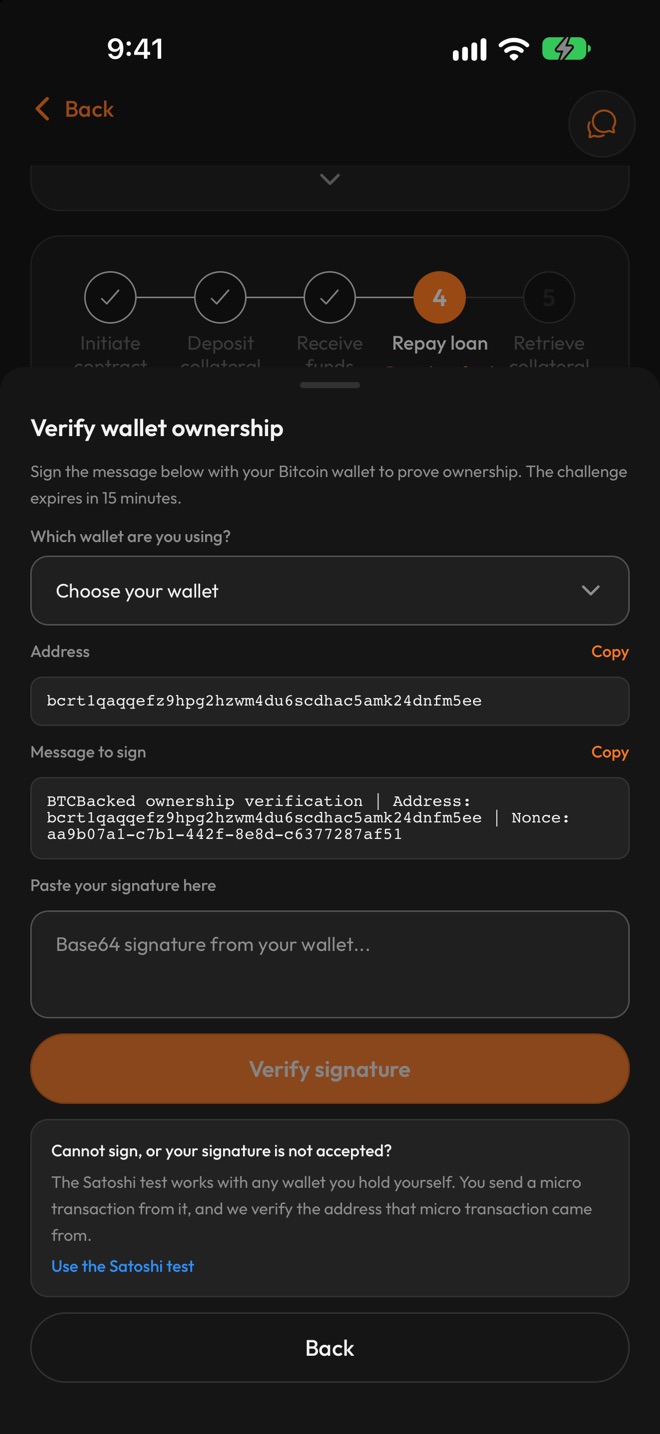 Prove the address is yours: sign the message, or use the Satoshi test.
13. Follow your loan
Your loan's card on Home shows the "Outstanding amount", which is what you still owe (10,800 USDT in the example). It also shows the "Remaining period", the "Current LTV" and the "Contract ID". Open the loan for the details, including the end date under "Remaining loan period" and the "BTC liquidation price".
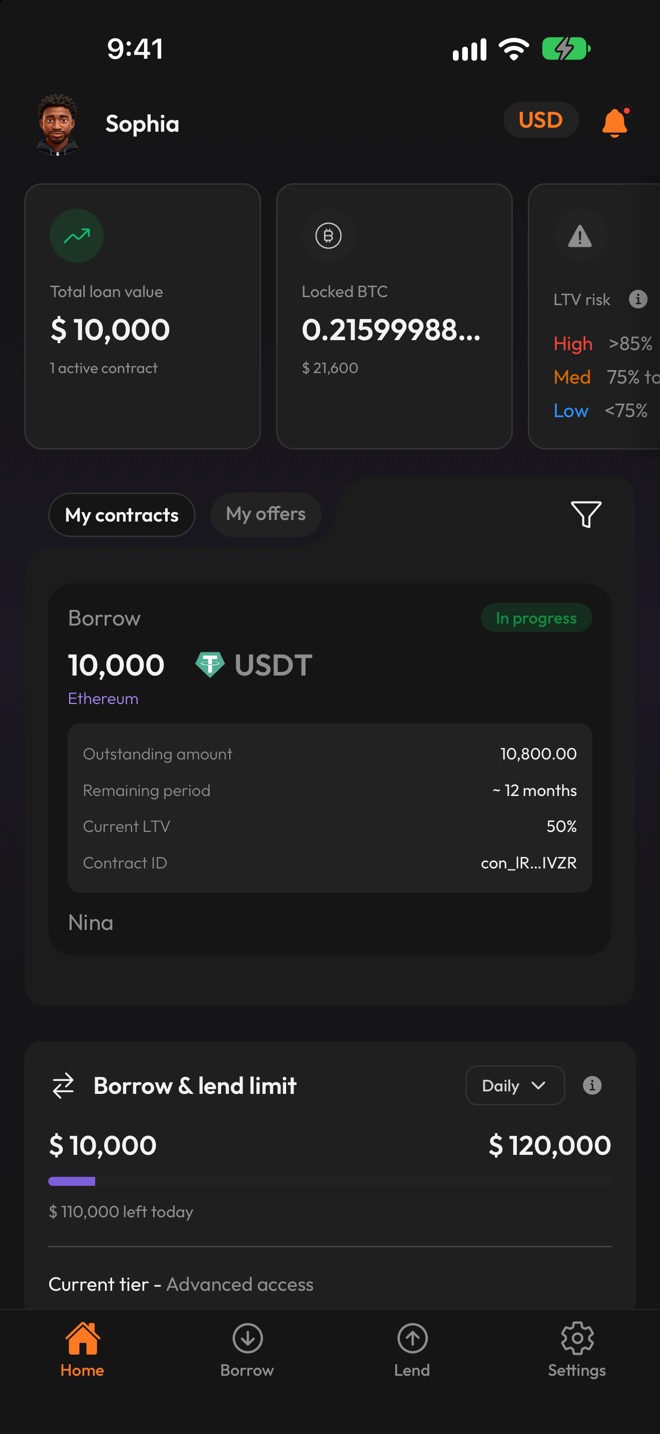 Follow what you owe and your loan-to-value on Home.
Your loan-to-value rises when the bitcoin price falls. At 90%, the collateral is liquidated (see "When is the collateral liquidated?" below). There are three warning levels (75%, 80% and 85%). You and the lender get an email and an in-app notification, and a push notification if you allow notifications. When your loan-to-value reaches 75%, the loan card on Home shows a "Medium LTV alert" badge, and above 85% a "High LTV alert" badge.
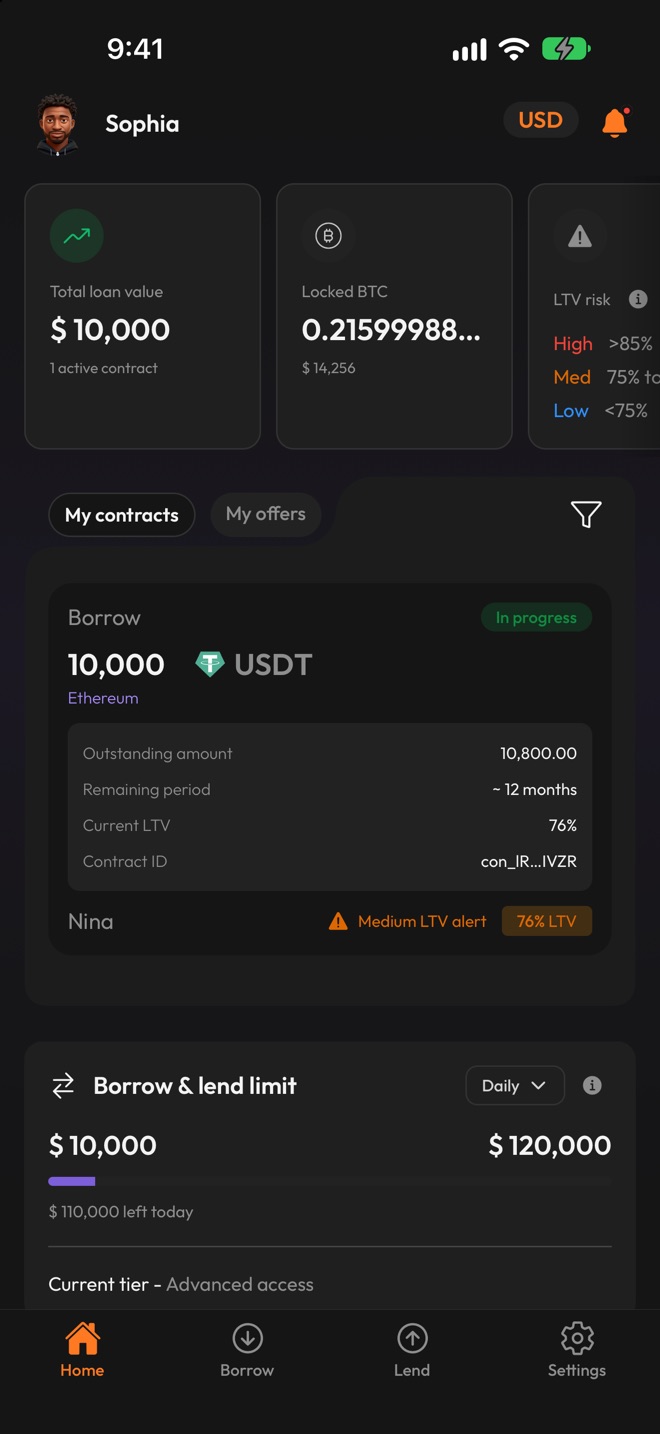 When the price falls, the card shows an alert.
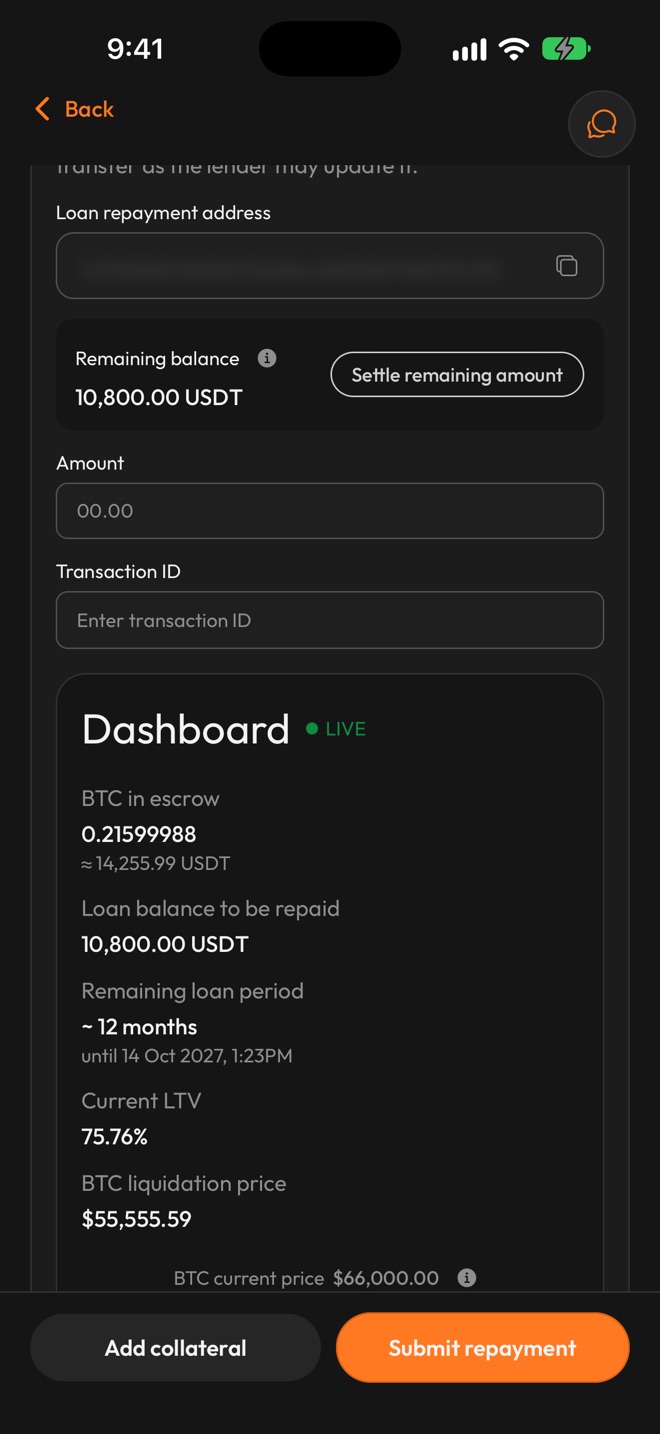 The loan page shows your liquidation price.
14. How to lower your loan-to-value (optional)
During the loan, you can add bitcoin to lower your loan-to-value. The app calls this a top-up.
- On the loan page, tap "Add collateral" and enter the "Amount (BTC)". If your loan-to-value is above 70%, the screen shows a "Suggested amount" that brings it back to 70%, together with the "Current LTV". Once you enter an amount, it also shows the "Projected LTV".
- Tap "Confirm" and send the amount to the escrow address shown. The app warns: "Send exactly this amount. A different amount will require manual review and may delay your top-up."
- Answer "Where did you send this BTC from?" again, as in step 9.
- When you submit your answer, the app shows "Collateral top-up submitted successfully".
A top-up request expires after 24 hours. While one is open, you cannot submit a repayment.
At 66,000 USD, the suggested 0.01776648 BTC brings the example loan back to 70%.
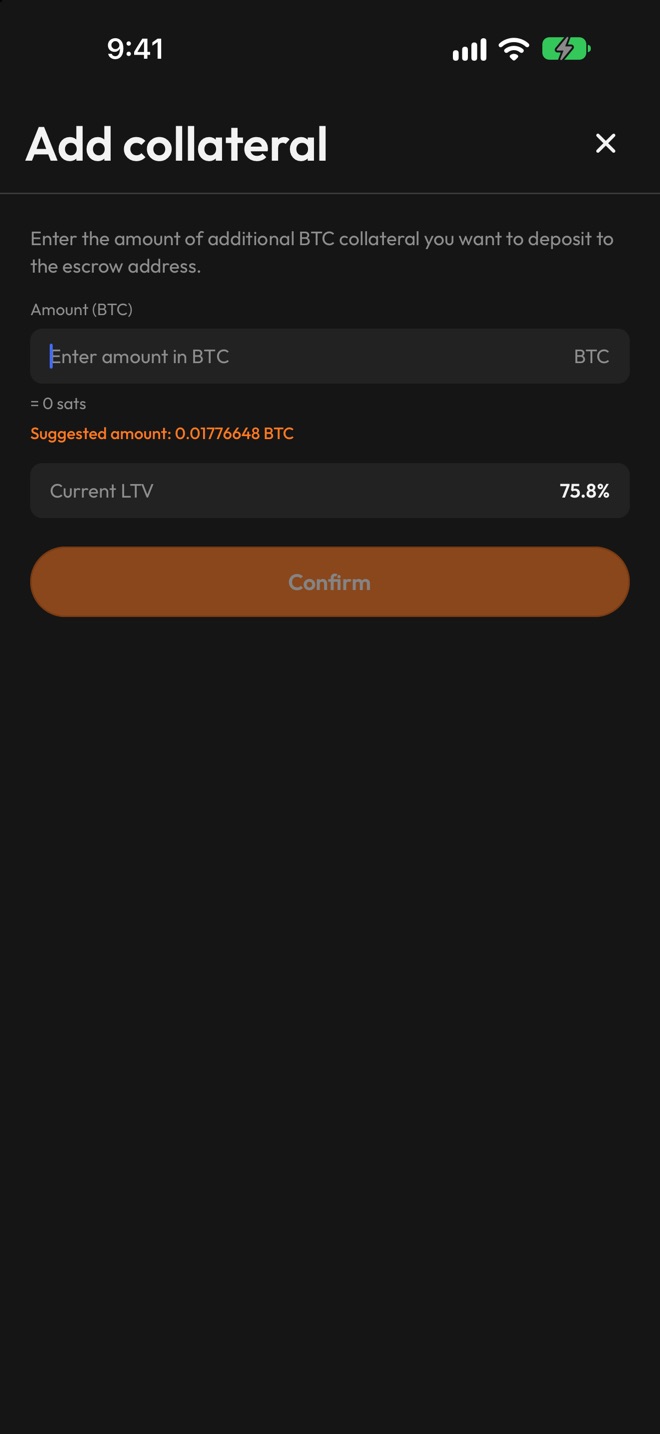 Use the suggested amount to get back to 70%.
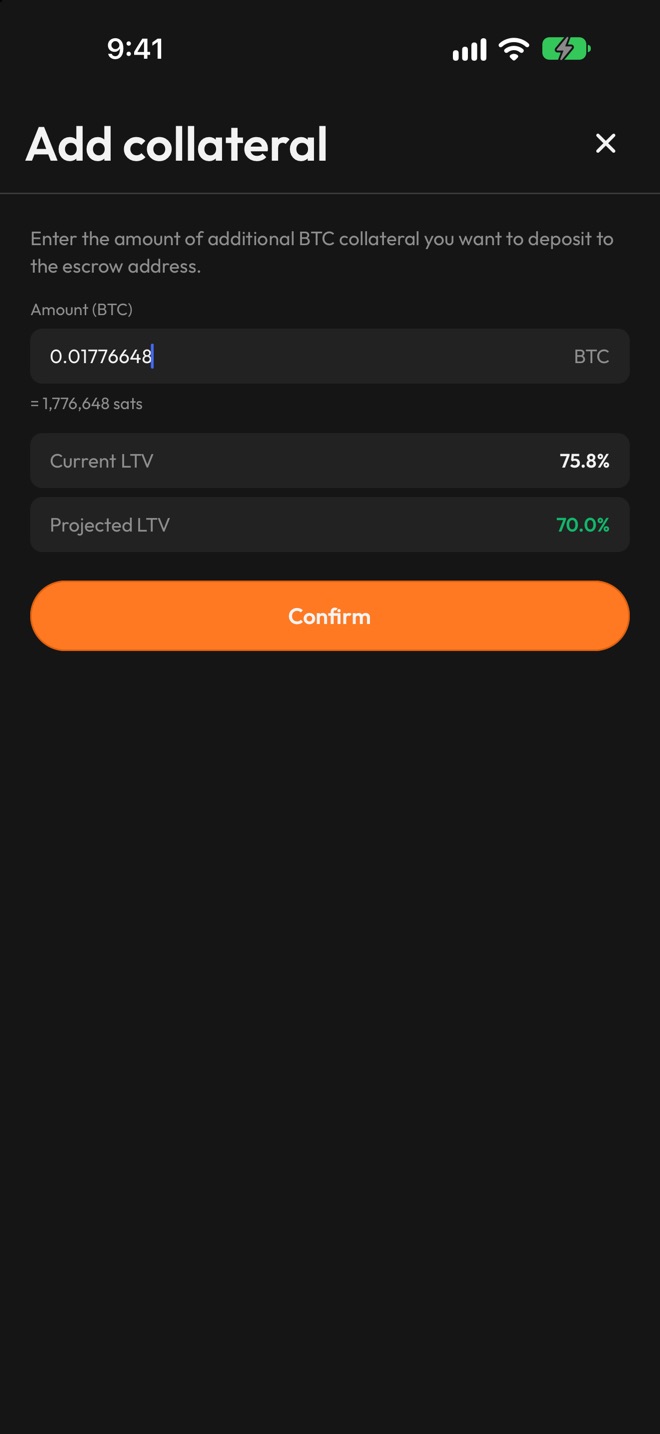 Enter an amount to see your new loan-to-value.
You can also repay part of the loan, as in step 15. It lowers your loan-to-value once the lender confirms it.
End the loan
15. Repay the lender
Send your repayments to the lender's "Loan repayment address", in the same stablecoin and on the same network as your loan. You can pay in one payment or several (10,800 USDT in total in the example). The screen warns: "Always check this address before each transfer as the lender may update it."
After each payment, enter the "Amount" and the "Transaction ID", and tap "Submit repayment". "Settle remaining amount" fills in the whole "Remaining balance".
The balance updates once the lender confirms your payment, which they must do within 12 hours. If they do nothing, a dispute opens automatically.
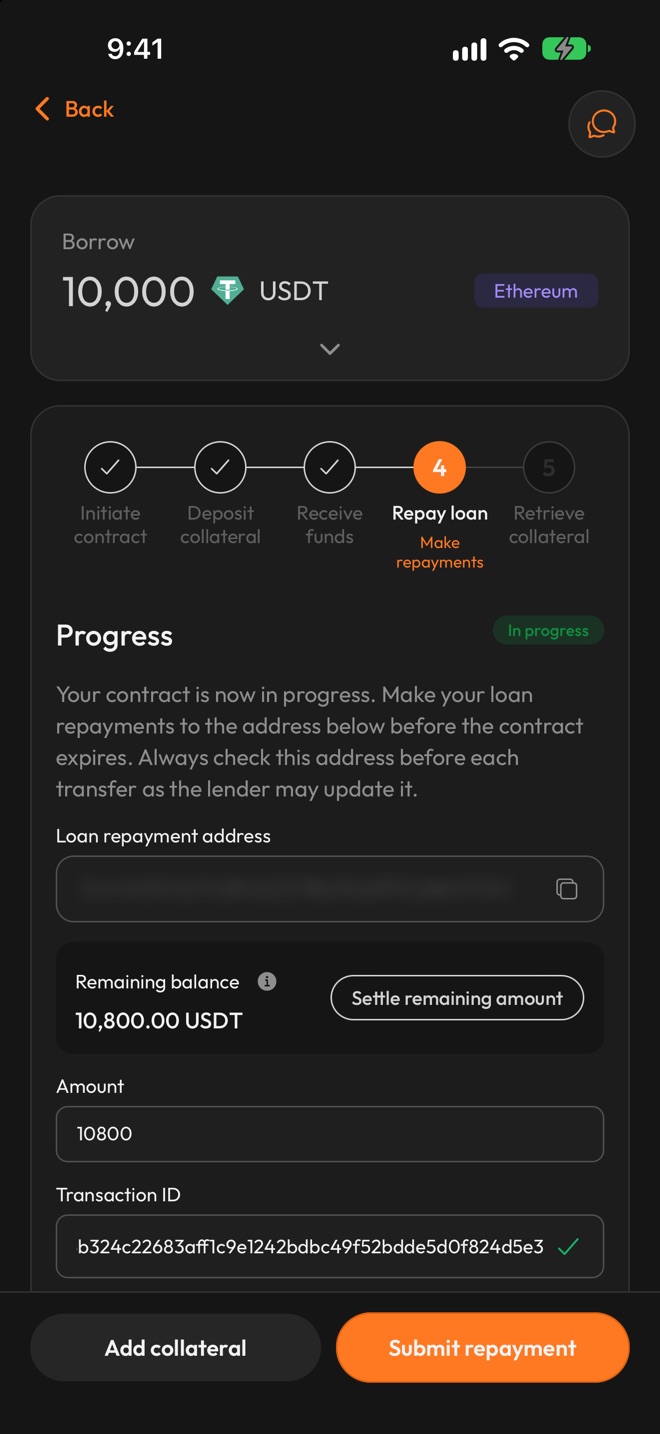 Pay the lender, then enter the amount and transaction ID.
16. Get your bitcoin back
When the lender has confirmed the full amount, the app asks you to "Sign the release transaction to retrieve your BTC collateral." The screen shows the "Total BTC in escrow", the "Network fee" taken from it, and the "Total BTC released to refund address". It also shows your "BTC refund address", with the reminder "Check this address before you sign."
Sign the release the same way as in step 11: with your escrow password, or in your wallet, depending on how you set up your escrow key in step 7. The bitcoin goes to your refund address.
Then rate the lender and BTCBacked and tap "Submit feedback". The app thanks you and takes you back to Home. The loan page then shows "Contract completed." and "Your BTC collateral has been released. The contract is now complete."
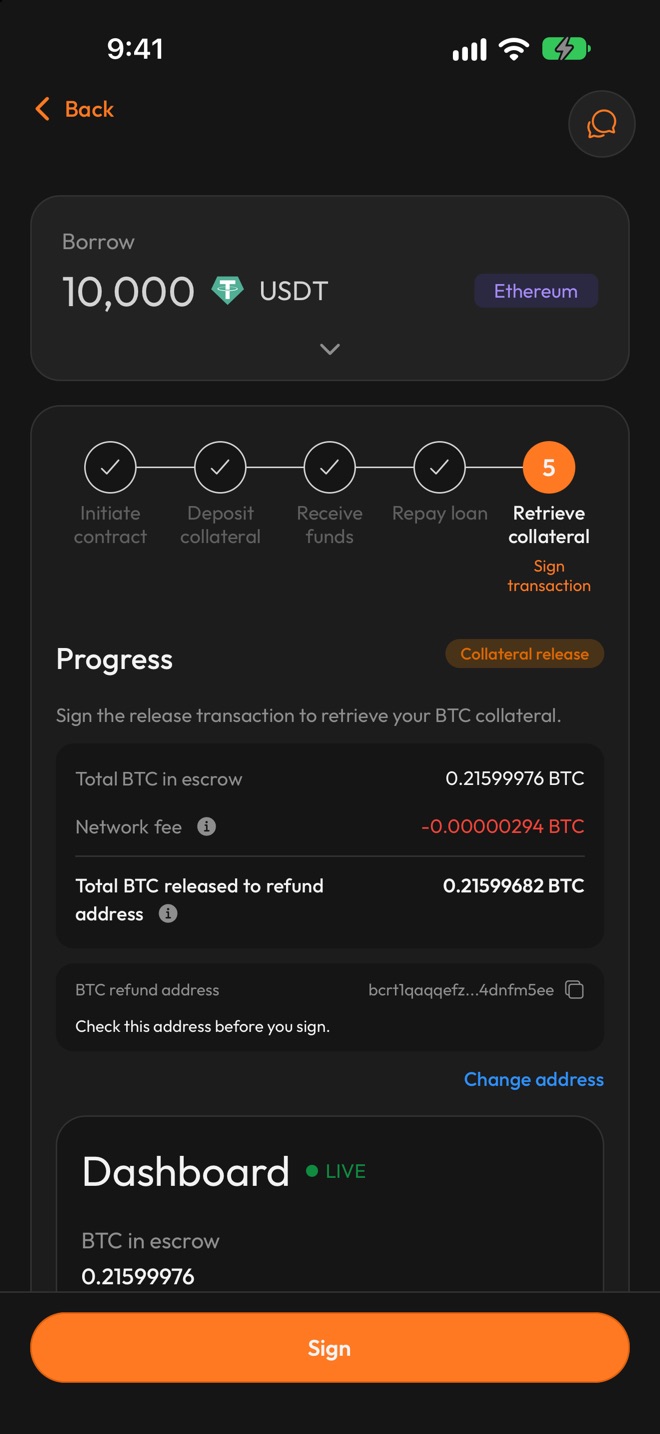 Check the refund address, then sign the release.
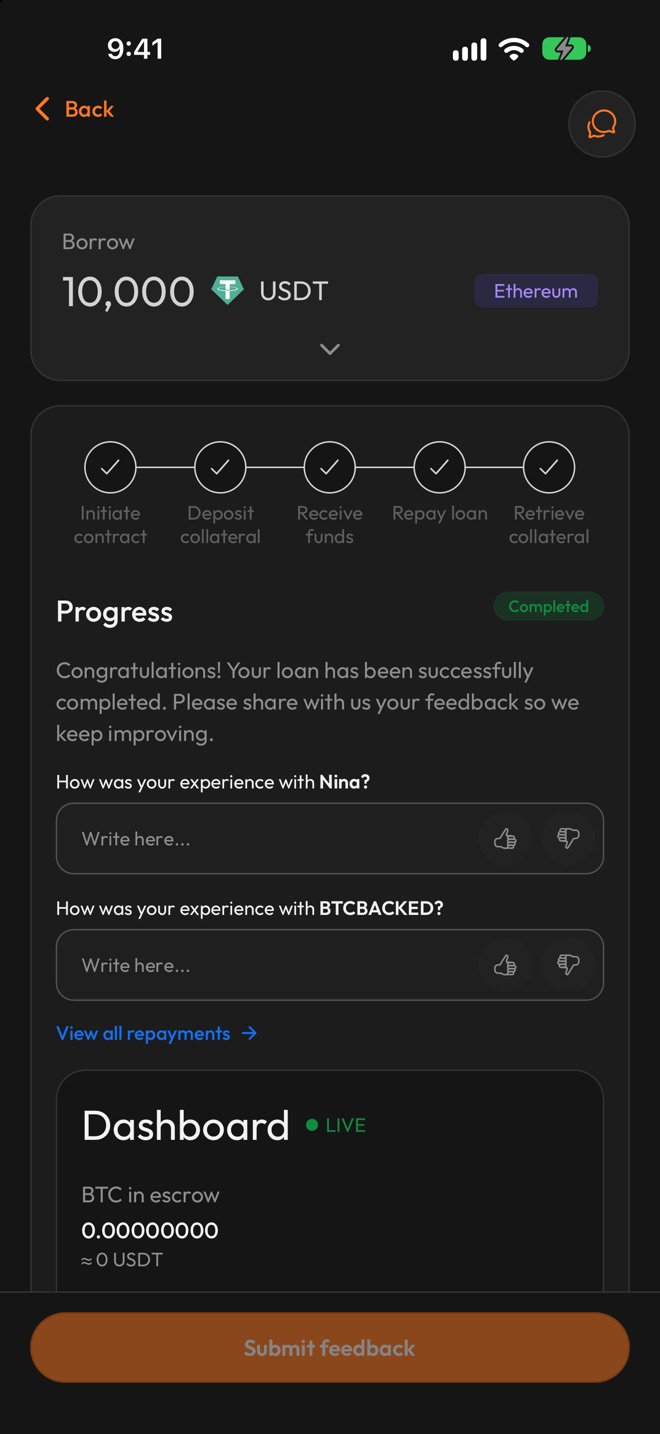 Finally, rate the lender and BTCBacked.
When is the collateral liquidated?
If the bitcoin price falls
Your loan-to-value rises, and you get the warnings described in step 13 (75%, 80% and 85%). If the price falls quickly, you may get fewer warnings before 90%, so always keep an eye on your loan-to-value. To bring it down, add collateral (step 14) or repay (step 15). At 90% the collateral is liquidated. If a repayment is still waiting for the lender's confirmation at that point, the loan goes to a dispute first. Read more about what happens when the price falls.
If you have not repaid in full by the end date
Liquidation starts on that date. There is no grace period and no extension. You get reminders 7 days and 1 day before the end date. If a repayment is still waiting for the lender's confirmation at the end date, the loan goes to a dispute first.
Liquidation is final
The offer page says: "Liquidation at 90% LTV or on default is final. A fee of 5% of the loan amount is taken from the collateral." The collateral is then paid out in this order (Escrow Terms, clause 30):
- The lender receives bitcoin worth up to the amount you still owe.
- BTCBacked receives its liquidation fee: 5% of the loan amount, converted into bitcoin at the same price used to pay the lender. The fee comes from what is left after the lender, so it is reduced, or not paid, if the collateral does not cover it.
- You receive the rest at your refund address, less the network fee. If you have not linked a refund address yet, the rest stays in the escrow until you do.
If the price falls fast, the collateral can be worth less than what you owe. After a liquidation, you owe nothing more under the loan agreement (Collateralized Loan Agreement, clause 41).
Example: liquidation at 90% loan-to-value
When the loan reaches 90%, you get the in-app notification "Contract liquidation started" and an email. The lender and BTCBacked sign the liquidation; you do not need to sign. While it waits for the lender, the loan page shows how the collateral will be split: "Sent to you", "Sent to lender", the "Liquidation fee 5%" and the "Network fee", with the note "Recalculated when the lender signs." Your share can change slightly at that point, because that is when the network fee is set. Afterwards, the loan page shows "Liquidation completed." The final figures are in the email "Contract liquidated".
In this example, the lender signed the liquidation at a bitcoin price of 55,000 USD, with the loan at 90.91%. The 0.21599988 BTC in the escrow were paid out like this:
| Paid to | BTC | Worth at 55,000 USD |
|---|---|---|
| The lender (the 10,800 USDT still owed) | 0.19636364 | 10,800 USD |
| BTCBacked (liquidation fee, 5% of 10,000 USDT) | 0.00909091 | 500 USD |
| The network fee | 0.00000418 | 0.23 USD |
| You, at your refund address | 0.01054115 | 579.76 USD |
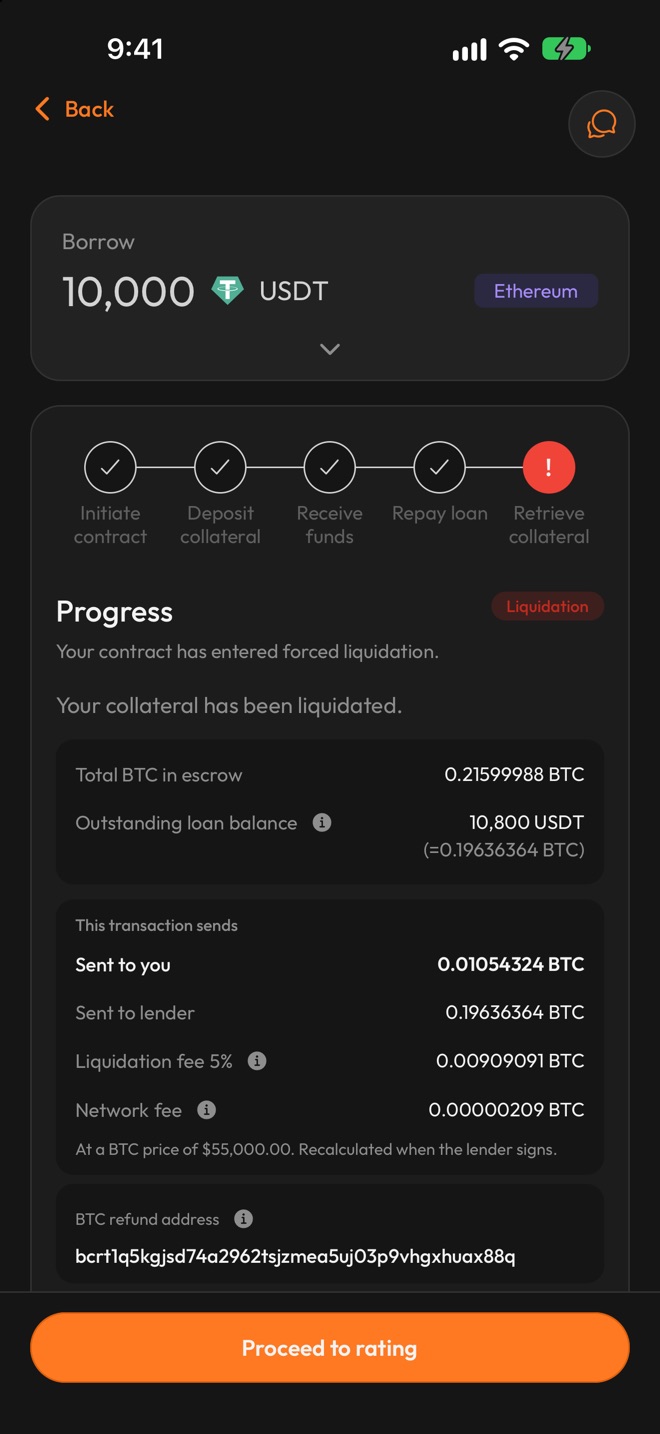 Before the lender signs, the page shows how the collateral will be split.
About BTCBacked. BTCBacked is a Swiss marketplace for non-custodial bitcoin-backed loans, headquartered in Zug. Borrowers and lenders agree the terms directly, and the collateral sits in a 2-of-3 multisig escrow on the Bitcoin blockchain. BTCBacked is supervised as a Swiss financial intermediary by VQF (member #101306). More about us
Last reviewed: 14 October 2026. This guide shows the BTCBacked phone app, version 1.1.2. The figures are an illustrative example. It is not legal, tax or investment advice.
Borrow against your Bitcoin without handing it to a custodian
Join BTCBacked and keep your key while you access liquidity.